10 PDF
10.1 Overview
In this chapter, you’ll learn how to create PDF documents with Quarto. PDF is the right target when you plan to print, need a single self-contained file to share, or care about the precise layout of content on “pages”.
We’ll focus exclusively on creating PDFs via Typst, i.e., format: typst. Typst is a modern typesetting system that comes bundled with Quarto. There are alternatives in Quarto, most notably, format: pdf which creates a PDF via LaTeX. We think for new authors, it’s both easier to get started and easier to advance with Typst:
Typst comes bundled with Quarto, so getting to your first PDF document requires nothing more than adding
format: typst.Typst compiles very quickly, reducing the time it takes to preview your changes.
Typst’s scripting language is similar to other languages you may already know (like R and Python), which makes it easier to understand existing templates and customize your documents.
There are situations where LaTeX may be a better fit:
You need to work with existing LaTeX templates, like a journal article template.
You already rely on LaTeX packages for advanced typesetting of math or equations.
If you are in these situations, you may find the PDF Basics guide in the Quarto documentation a better place to start.
Readers who use screen readers and other assistive technologies generally have a smoother experience with HTML (Chapter 9) than with PDF. If that describes part of your audience — or if accessibility is a primary concern — HTML is often the better target. Accessible PDFs are possible (we’ll cover that in Section 10.11), but the tooling ecosystem is younger.
In the next section, you’ll create your first PDF document with format: typst. Then, you’ll cover the types of content you’ll most likely need in your first few documents: navigation, citations, math, code blocks, and computational outputs.
In Section 10.11, you’ll learn the keys to creating accessible PDFs, and in Section 10.12, how to customize the page layout, fonts, and colors of your document.
Finally, you’ll learn where to head next if you need to go beyond Quarto’s default Typst options.
10.2 Your first PDF document
Creating a PDF is as simple as adding format: typst to your document header:
---
format: typst
---
Here’s a short but complete example, with some common content types — headings, a table, and cross-references:
train-punctuality.qmd
---
title: "Route Punctuality Report"
author: "Dr. Sarah Okonkwo"
format: typst
---

## On-time performance

@tbl-punctuality shows the on-time rate for six routes during Q4, broken down by peak and off-peak services.

| Route             | Peak (%) | Off-peak (%) |
|:------------------|:--------:|:------------:|
| Central–North     | 82       | 91           |
| Central–East      | 78       | 88           |
| Harbour–Airport   | 71       | 85           |
| West Loop         | 88       | 94           |
| Coastal Express   | 65       | 79           |
| University Line   | 90       | 96           |

: On-time rates by route and service period {#tbl-punctuality}

Off-peak services consistently outperform peak services across all routes, with the Coastal Express showing the largest gap.

## Recommendations

Based on the results in @tbl-punctuality:

- Investigate causes of delays on the Coastal Express and Harbour–Airport routes
- Review peak-hour scheduling on Central–East to close the gap with off-peak performance
- Use the University Line and West Loop as benchmarks for network-wide improvement
To create the PDF, render, either by Previewing in your IDE or in the terminal:
Terminal
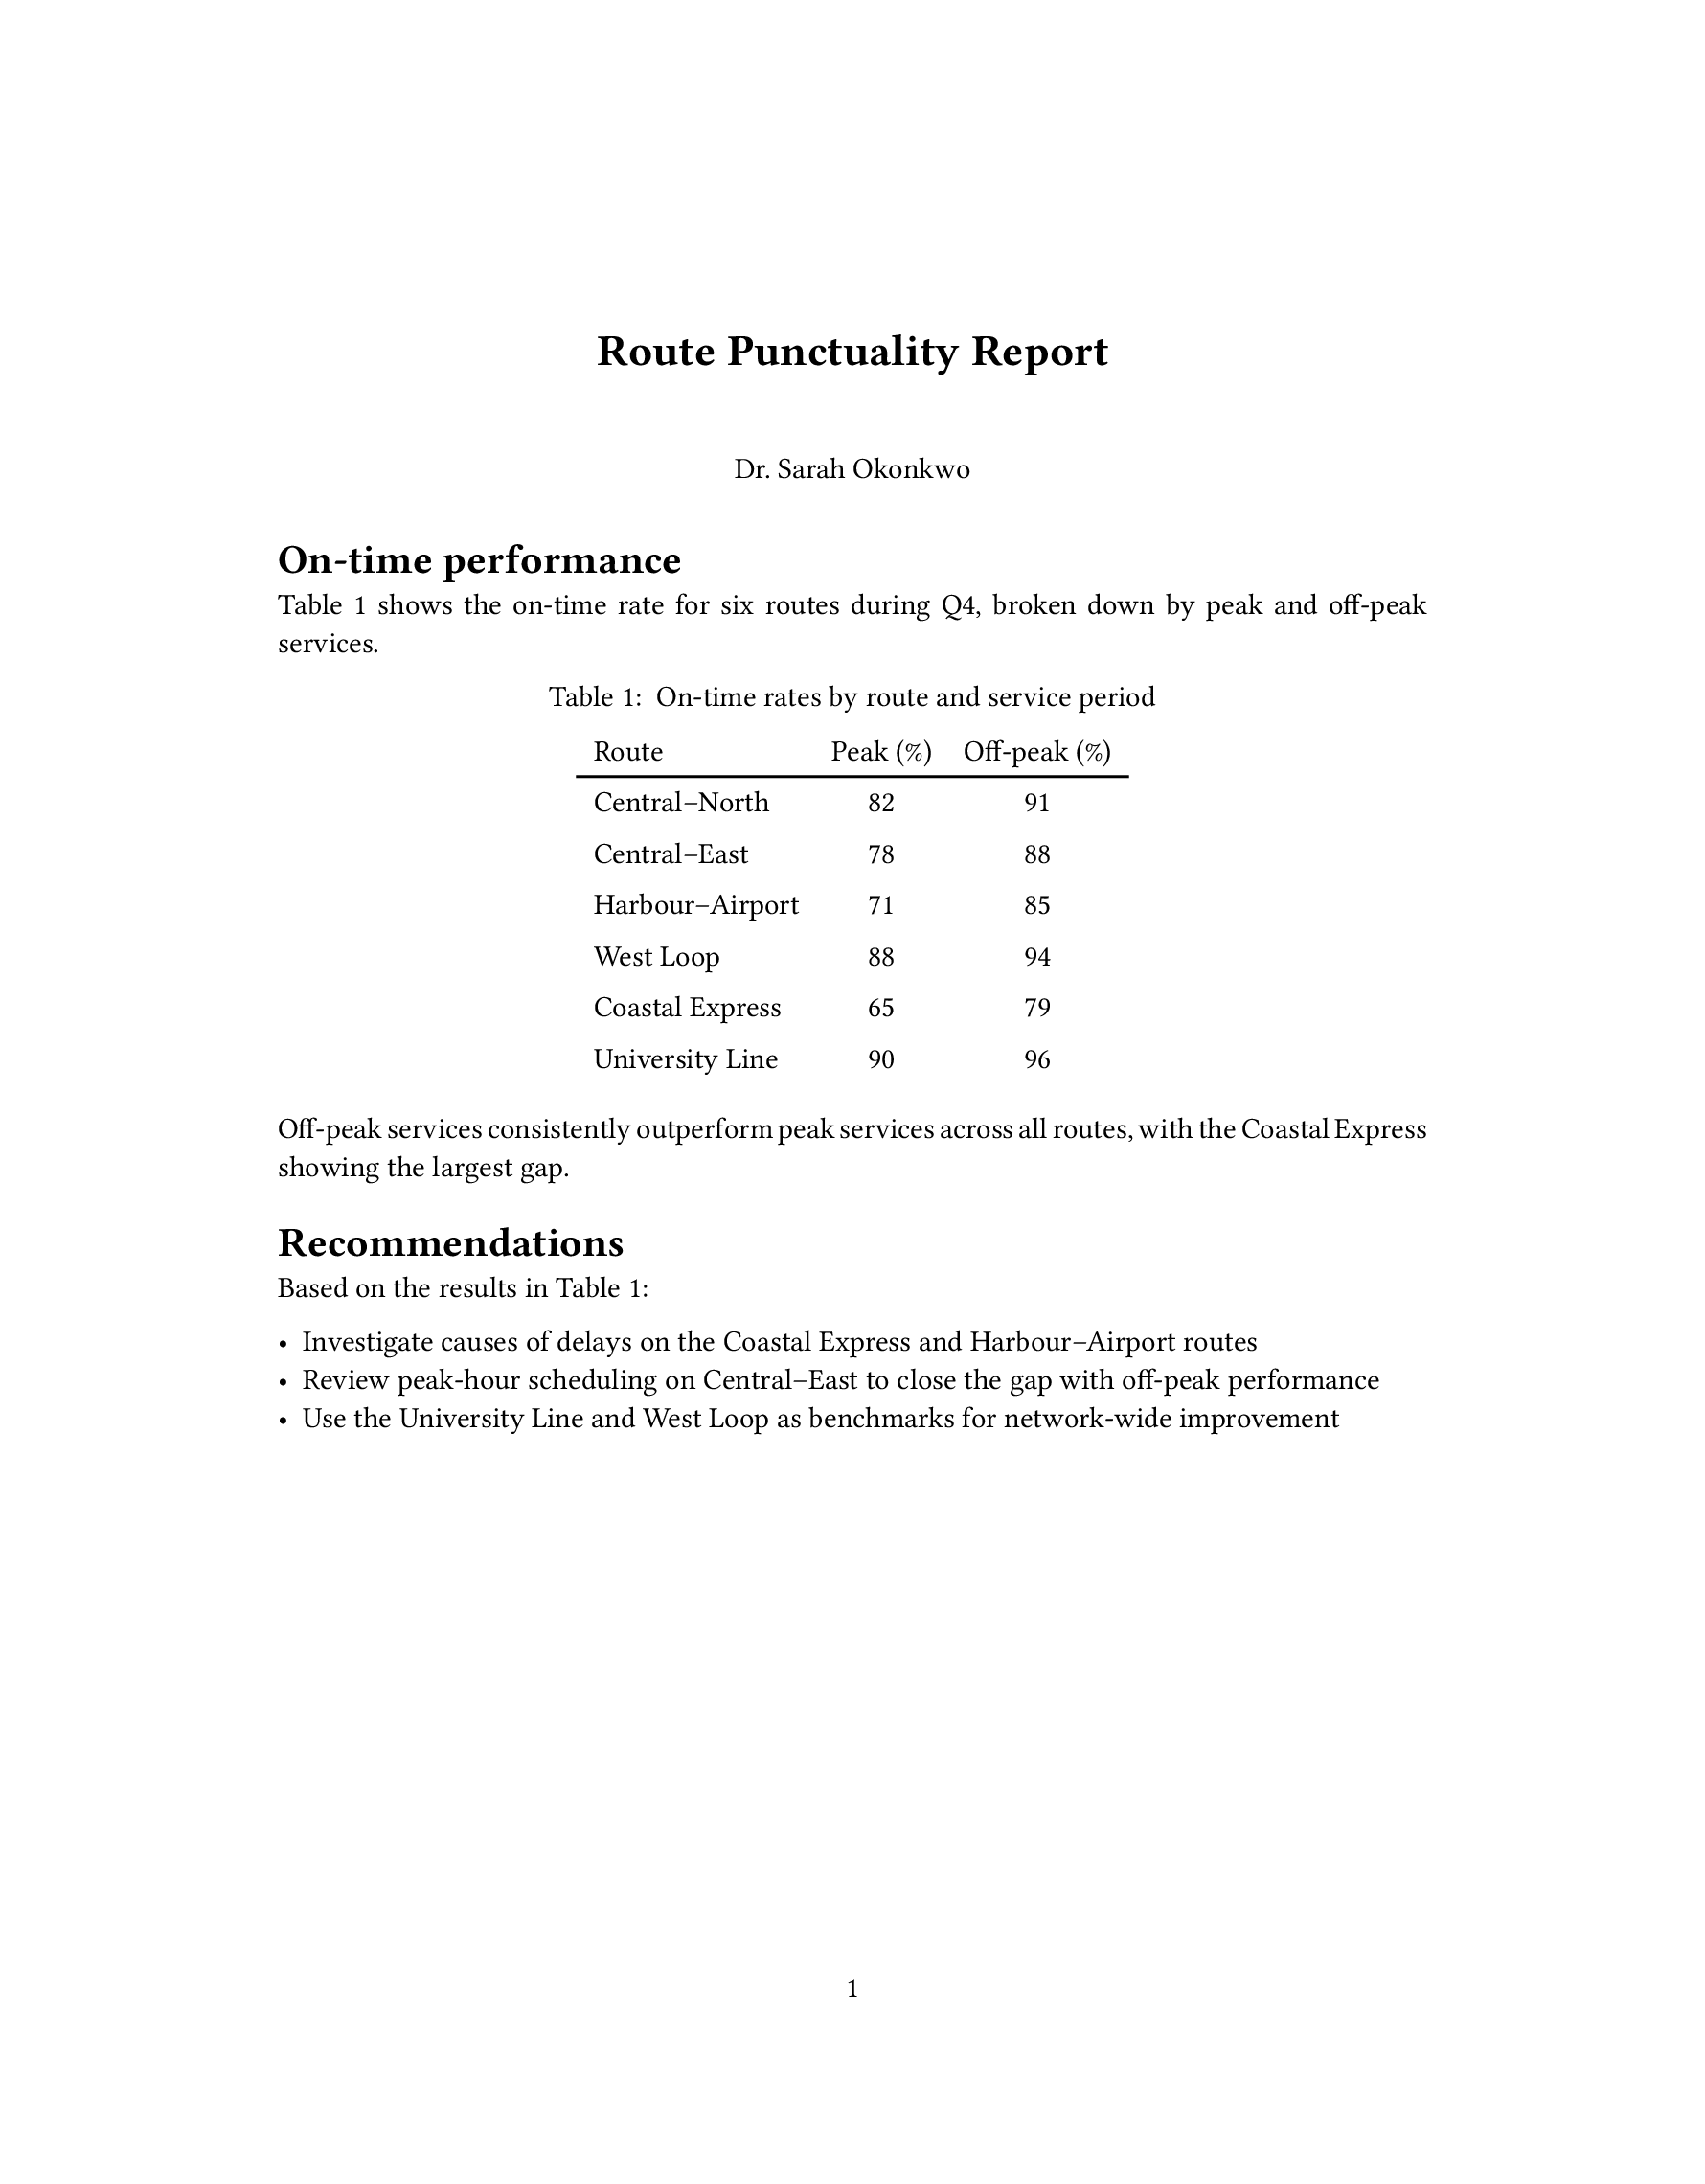
quarto render train-punctuality.qmdBehind the scenes, Quarto converts your markdown source into Typst’s own markup language (.typ), then uses the bundled Typst to compile the .typ to PDF. The result is train-punctuality.pdf, the rendered PDF, shown in Figure 10.1.
train-punctuality.qmd
You can see the headings, table and cross-references all “just work”. In the following sections, we’ll cover other common content types you commonly need in your first few documents. You can also check out Chapter 12 for a more comprehensive set of features available across formats, including format: typst.
You can try swapping to format: typst in any existing Quarto document. Most markdown features will carry over, but beware of features that introduce interactivity, like code folding or hover effects; these won’t be supported in PDF because PDF is a static format.
10.3 Navigation
PDF documents support links, allowing your readers to quickly navigate your document. To make navigation easier for readers, you can add a table of contents (toc) and section numbers (number-sections) in your document header:
train-punctuality.qmd
---
format:
  typst:
    toc: true
    number-sections: true
---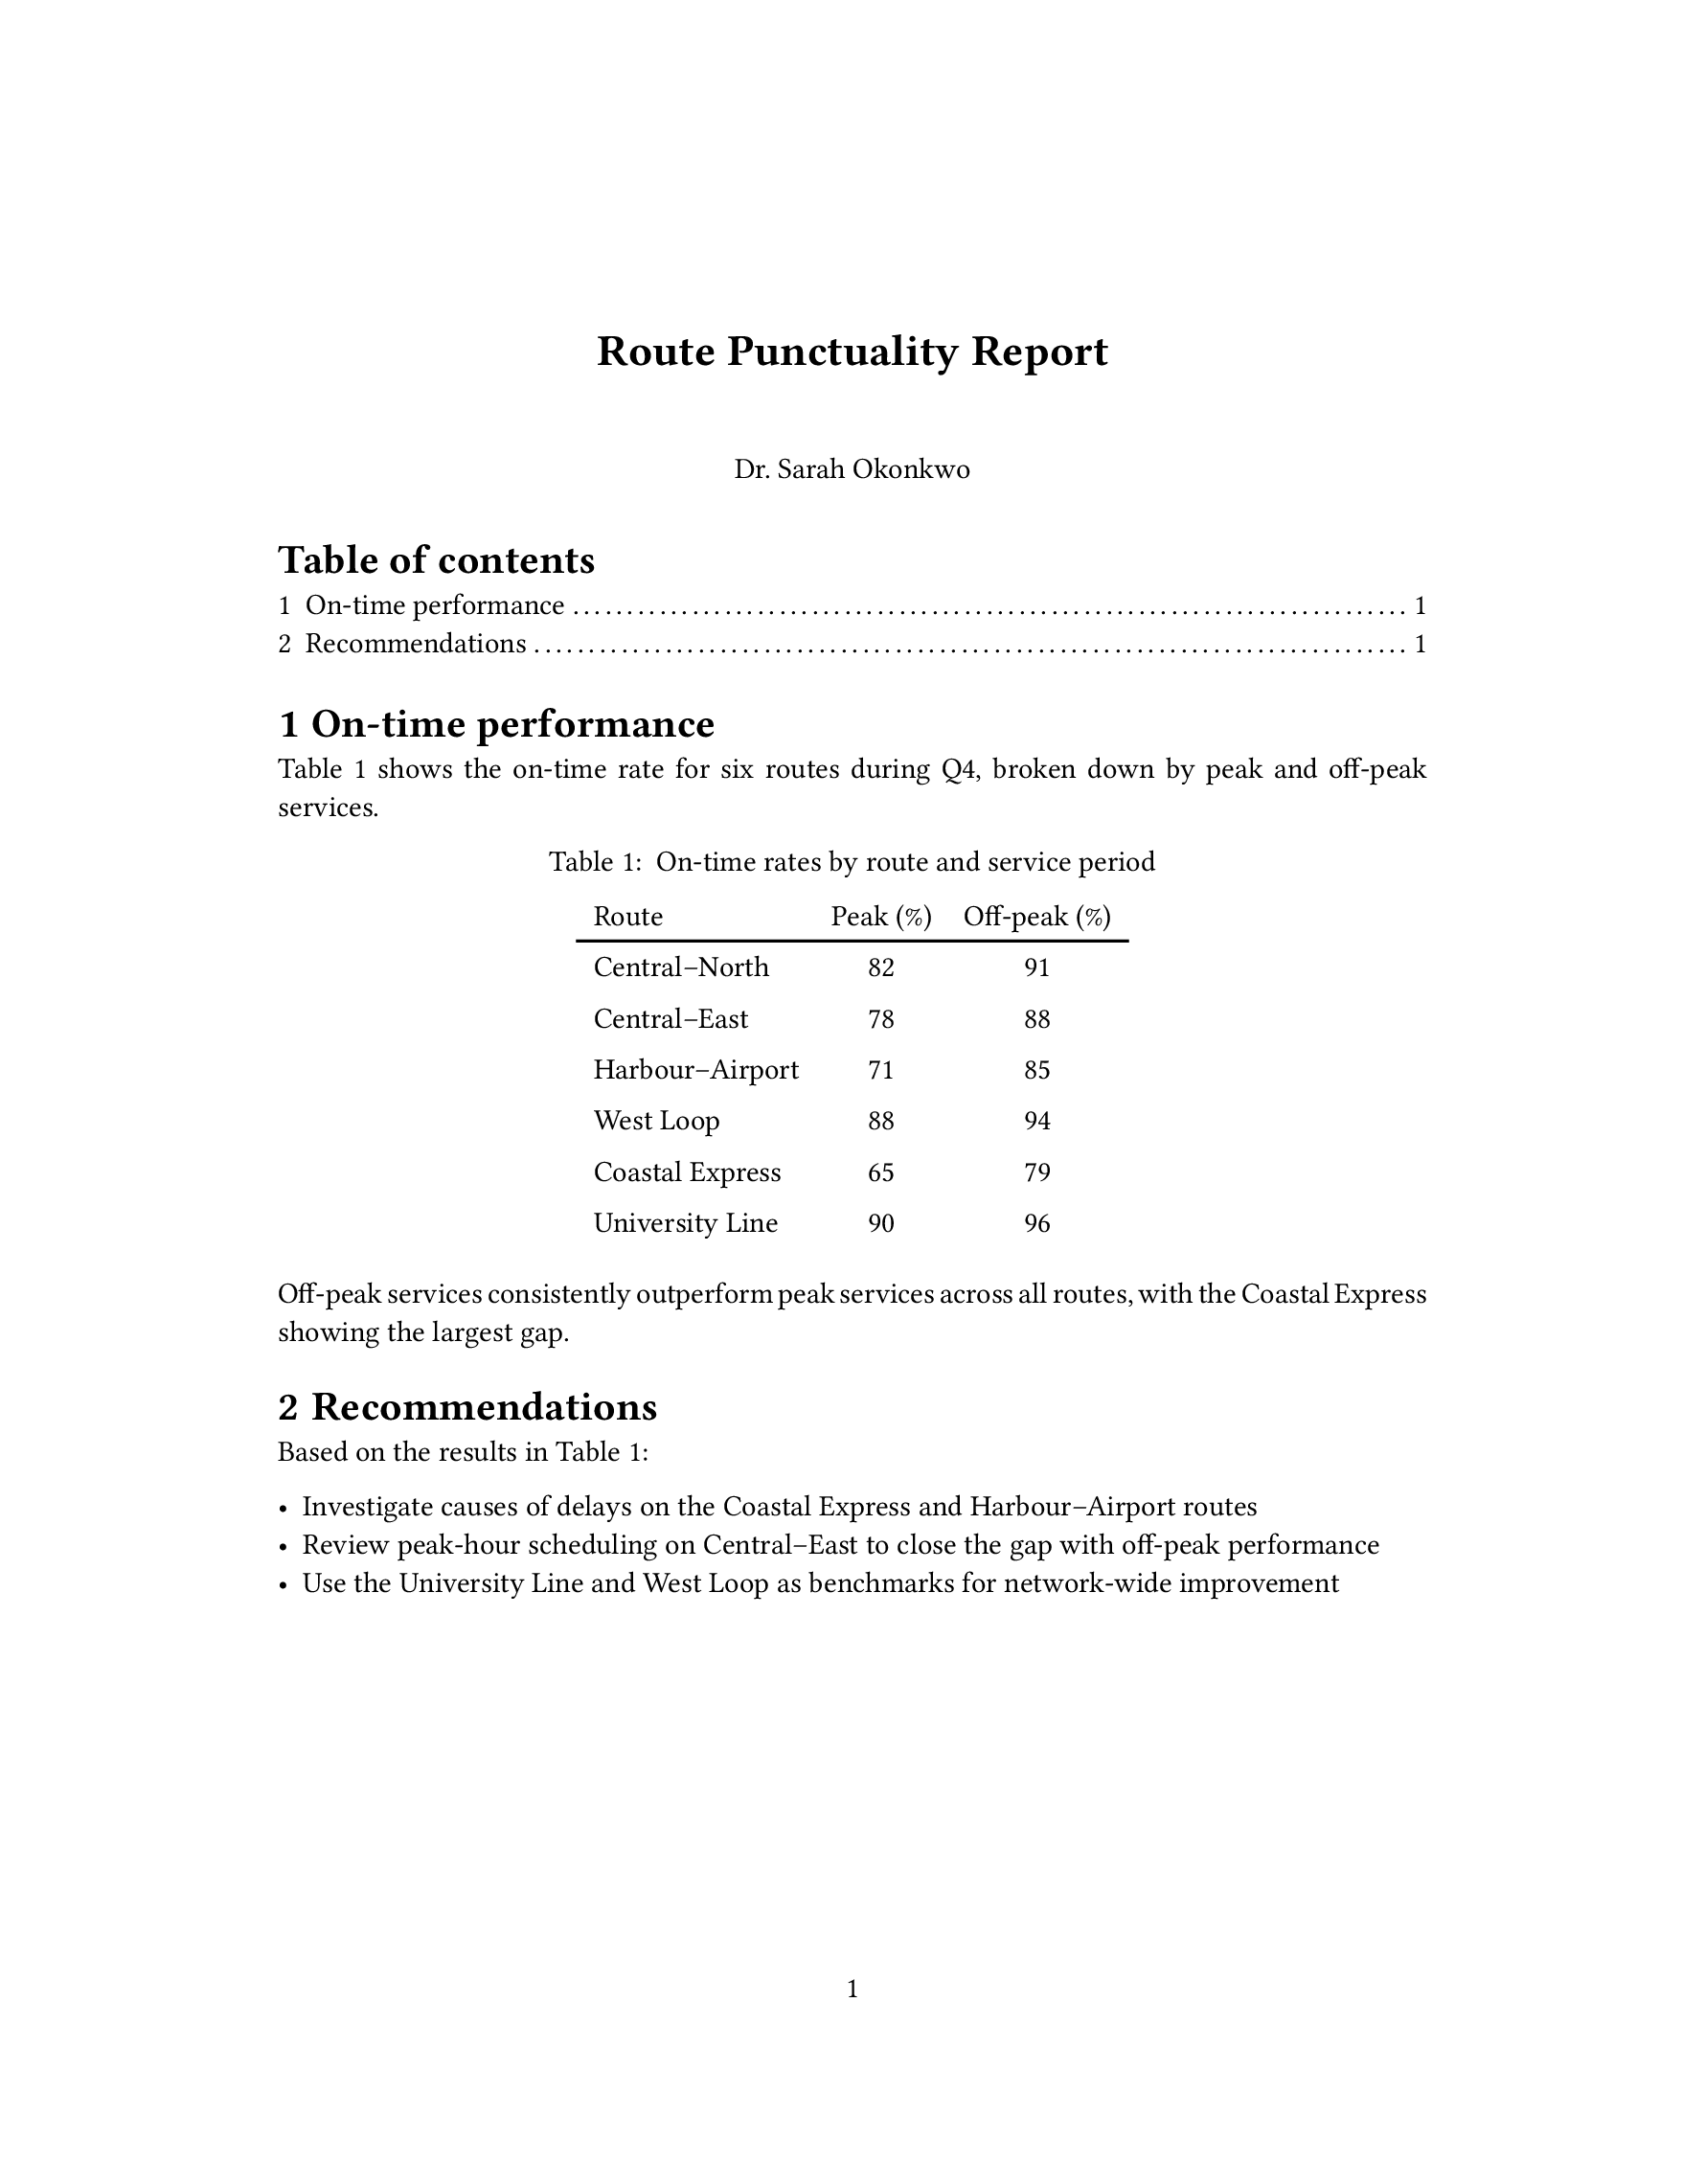
train-punctuality.qmd rendered with toc: true and number-sections: true
Items in the table of contents and cross-references are automatically clickable links that take readers to the relevant item.
10.4 Links
You can also use markdown link syntax to add links directly to other sections in your document, or to external resources:
train-punctuality.qmd
Revisit the [Summary](#summary) for context, and see the [Q1 on-time dashboard](https://transit.example.com/ontime/2026-q1) for the full breakdown by route.Both render as plain text in the default template — they’re clickable in a PDF viewer, but visually indistinguishable from the surrounding prose. You’ll learn how to style them in Section 10.12.2.
10.5 Citations
Citations require a bibliography file holding reference metadata. A common format for this is BibTeX (.bib):
references.bib
@report{railregulator2023,
  author  = {{Office of Rail and Road}},
  title   = {Passenger Rail Performance: Annual Statistics},
  year    = {2023},
  institution = {Office of Rail and Road}
}
To cite an item in the bibliography, specify the bibliography file in bibliography and use the @ syntax in your text:
train-punctuality.qmd
---
bibliography: references.bib
---

The industry standard for on-time performance is 90% [@railregulator2023].
Citations in format: typst use Typst’s native processing and, consequently, a different default citation style from other Quarto formats. You can specify the citation style with the csl option. Set csl: chicago-author-date to get the same Chicago author-date style as HTML output:
train-punctuality.qmd
---
format: typst
bibliography: references.bib
csl: chicago-author-date
---
You can read more about citations in Section 12.11, including about various @ syntax variations.
10.6 Mathematical equations
When you author to Typst from Quarto, use TeX math syntax to write your equations. Use single dollar signs ($...$) for inline math, and double dollar signs ($$...$$) for display equations:
equations.qmd
The mean on-time rate, $\bar{x}$, summarises performance across all routes.

$$
\bar{x} = \frac{1}{n}\sum_{i=1}^{n} x_i
$$ {#eq-mean}
Typst has its own (non-TeX) math notation, but you won’t need to learn it, because Quarto converts TeX math to Typst math for you. This keeps math portable — the same TeX syntax renders across HTML, Typst and other formats without edits.
You can read more about writing equations, including cross-referencing, in Section 12.9.
10.6.1 Alt text
Alt text makes an equation accessible to screen readers and is required to meet the PDF/UA-1 standard (you’ll learn more about this standard in ?sec-accessibility). You can add alternative text to cross-referenced display equations with an alt= attribute:
equations.qmd
$$
\bar{x} = \frac{1}{n}\sum_{i=1}^{n} x_i
$$ {#eq-mean alt="Sample mean: sum of all values divided by the number of observations"}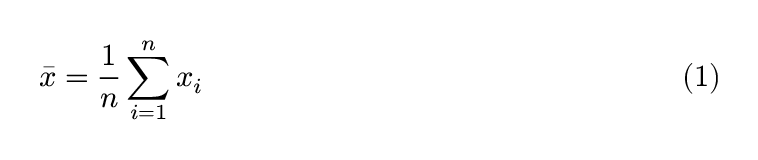
There is currently no way to add alt text to inline math in format: typst.
10.6.2 Theorems
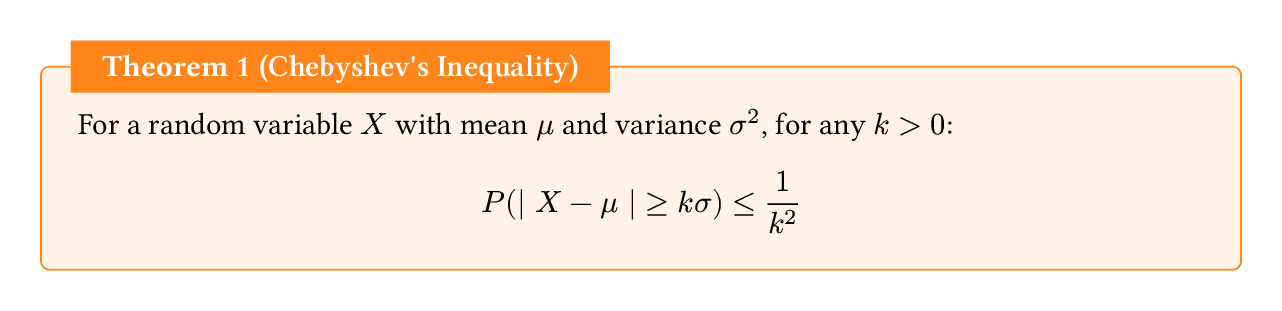
When you use one of Quarto’s theorem environments, you’ll get special styling in Typst. To declare a theorem, you wrap it in a fenced div with an identifier that starts with #thm-:
theorem.qmd
::: {#thm-chebyshev}
## Chebyshev's Inequality

For a random variable $X$ with mean $\mu$ and variance $\sigma^2$, for any $k > 0$:

$$P(|X - \mu| \geq k\sigma) \leq \frac{1}{k^2}$$
:::
The default theorem appearance is simple: a bold title followed by italic body text. Switch to a different flavor with theorem-appearance:
_quarto-fancy.yml
format:
  typst:
    theorem-appearance: fancy
The available options are simple, fancy, clouds, and rainbow:

simple
fancy
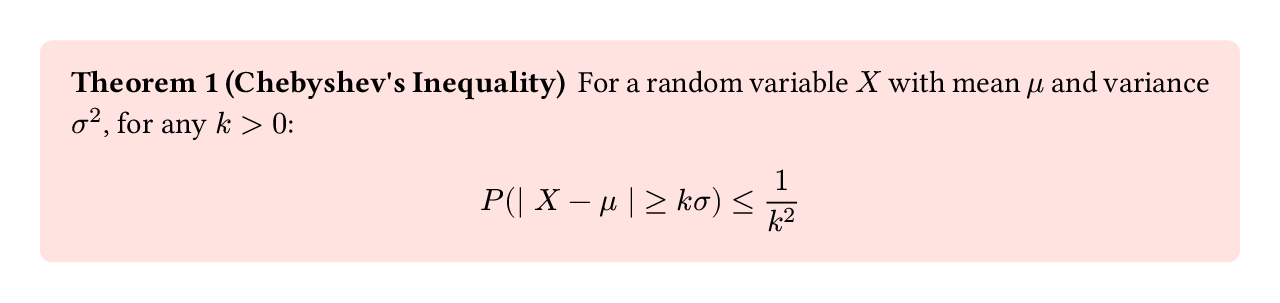
clouds
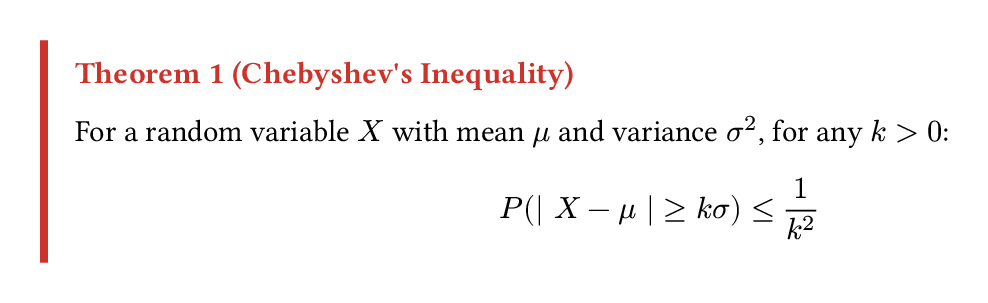
rainbow
theorem-appearance to style theorems.
theorem-appearance applies to every type of theorem-like element Quarto recognizes, not just thm-. When you use fancy, clouds, or rainbow, different types get different accent colors so you can tell a definition from a theorem at a glance. You can find all the available types in Section 12.9.1.
10.7 Code blocks
When you include a code block, it will get automatic syntax highlighting based on the language you specify. For example, here’s a code block specified as r:
report.qmd
Compute on-time rates from counts for each route:

```r
on_time <- c(142, 98, 201, 87, 165)
total   <- c(154, 110, 215, 95, 178)
rate    <- round(on_time / total * 100, 1)
cat("On-time rates (%):", rate)
```
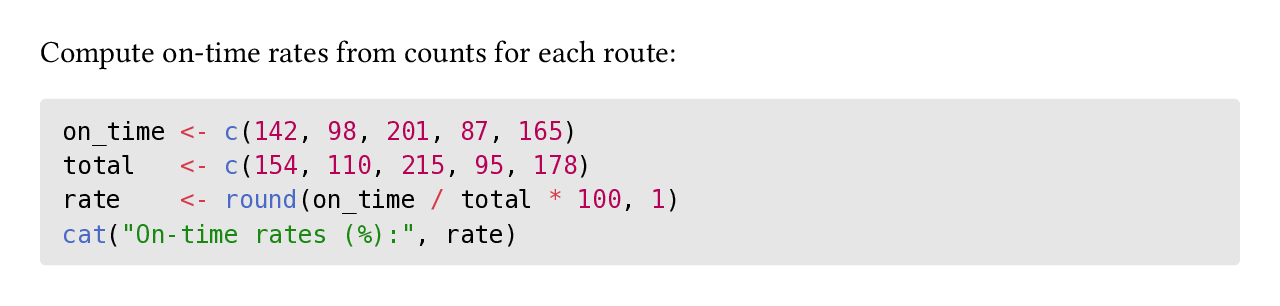
In the PDF, the block gets R syntax highlighting as shown in Figure 10.8. Executable code cells that are echoed in your document get the same treatment, so your code is styled consistently.
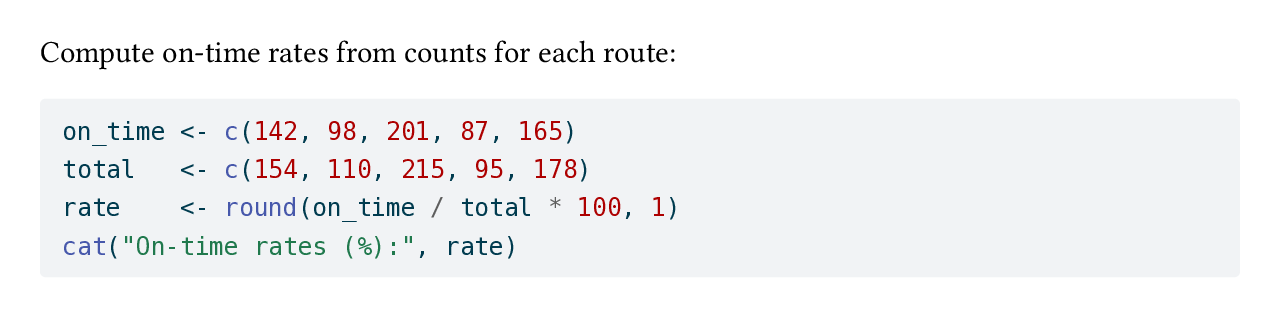
arrow syntax highlighting of an R code block in a Typst document
The default highlighting theme is arrow. Pick a different one with syntax-highlighting:
report.qmd
---
format:
  typst:
    syntax-highlighting: github
---
Supported themes include: a11y, arrow, pygments, tango, espresso, zenburn, kate, monochrome, breezedark, haddock, atom-one, ayu, breeze, dracula, github, gruvbox, monokai, nord, oblivion, printing, radical, solarized, and vim.
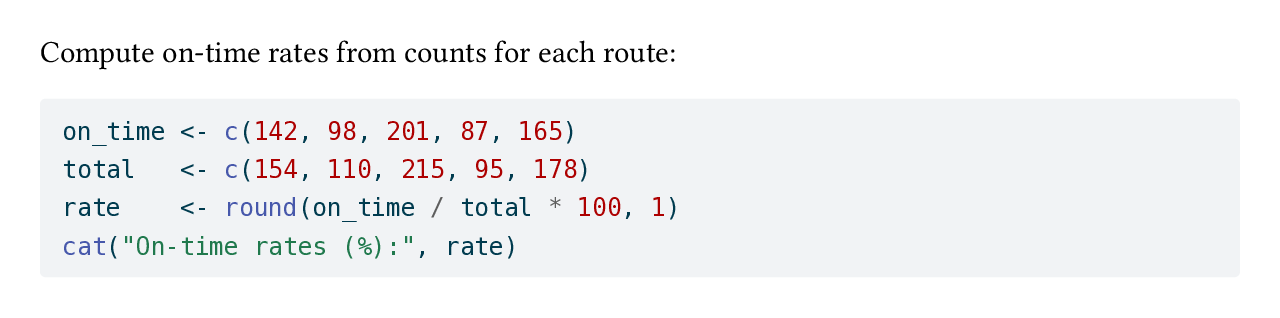
Typst also has a native highlighter, if you’d prefer to use it, you can set syntax-highlighting to idiomatic:
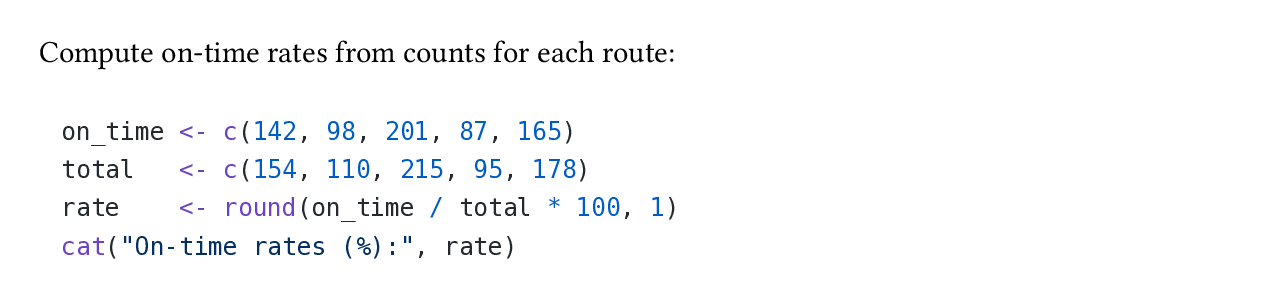
github
idiomatic
github theme for syntax highlighting and Typst’s native idiomatic theme.
10.7.1 Filename
You can add a filename attribute to label the code block:
report.qmd
Compute on-time rates from counts for each route:

```{.r filename="analysis.R"}
on_time <- c(142, 98, 201, 87, 165)
total   <- c(154, 110, 215, 95, 178)
rate    <- round(on_time / total * 100, 1)
cat("On-time rates (%):", rate)
```
The filename renders as a label on the code block, as shown in Figure 10.10.
analysis.R
[CVW] Figure 10.10 currently shows the pre-fix behaviour: the filename label isn’t rendered. Regenerate the screenshot and remove this note once https://github.com/quarto-dev/quarto-cli/pull/14170 is merged.
10.8 Computational outputs
Computational code cells work in format: typst just as they do in other formats. Outputs like figures, tables, and inline values are inserted into the PDF at the point of the cell.
For example, here’s a cell that produces a figure:
report.qmd
```{r}
#| label: fig-punctuality
#| fig-cap: On-time rate by route
#| fig-alt: A bar chart of on-time rates by route, showing values between roughly 85% and 95% across the Northern, Central, Circle, District, and Jubilee routes.
#| echo: false

library(ggplot2)

ggplot(trains, aes(x = route, y = rate)) +
  geom_col(fill = "#4e79a7") +
  labs(x = NULL, y = "On-time rate (%)") +
  theme_minimal()

```
report.qmd
```{python}
#| label: fig-punctuality
#| fig-cap: On-time rate by route
#| fig-alt: A bar chart of on-time rates by route, showing values between roughly 85% and 95% across the Northern, Central, Circle, District, and Jubilee routes.
#| echo: false

from plotnine import ggplot, aes, geom_col, labs, theme_minimal, element_blank, theme

(
    ggplot(trains, aes(x="route", y="rate"))
    + geom_col(fill="#4e79a7")
    + labs(x=None, y="On-time rate (%)")
    + theme_minimal()
    + theme(axis_title_x=element_blank())
)

```
The cell uses echo: false, so the code itself is hidden in the rendered output; the figure appears directly below the surrounding prose with a numbered caption, as shown in Figure 10.11.
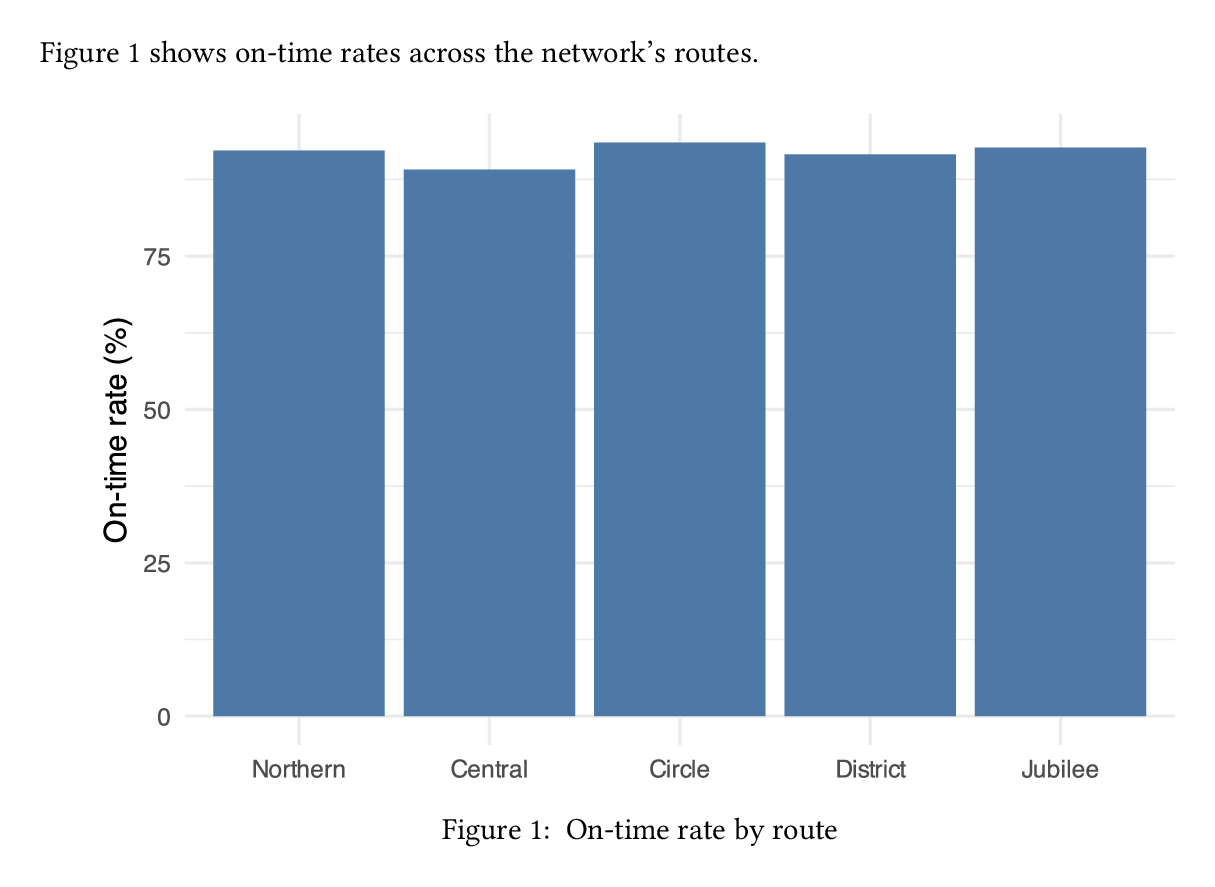
While most computational outputs render as expected, there are a few quirks to be aware of that we’ll cover in the sections below: figure formats, table formats, and long tables.
10.8.1 Figure format
Quarto defaults to SVG for computational figures in Typst. SVG is a vector format, so it scales well and looks crisp at any size. However, it can be slow to render when a figure contains many elements, like a busy scatterplot with thousands of points. Set fig-format in the document header to switch default format, e.g. to png for raster output:
report.qmd
---
format:
  typst:
    fig-format: png
---
10.8.2 Table formats
Any code that produces a markdown, HTML, or raw Typst table will render as a table in your PDF. Often it’s not easy to tell which format you’ve ended up with. The easiest way to check is to add keep-md to your header:
report.qmd
---
format:
  typst:
    keep-md: true
---
Then examine the table output in the resulting .md file, e.g. report.typst.md.
For simple tables, code that outputs a markdown table (Section 12.7.1) will often be the best choice. Markdown tables are converted to native Typst tables by Quarto and inherit your document’s styling, such as fonts and colors, so the table blends with the rest of your document.
The advantage of HTML tables (Section 12.7.3) is that cell-level formatting, such as data-dependent coloring, will be preserved. For example, the following code blocks use the gt package in R and great_tables in Python to produce tables with colored cells:
report.qmd
```{r}
library(gt)

gt(trains) |>
  cols_label(route = "Route", on_time = "On time", total = "Total", rate = "On-time rate (%)") |>
  fmt_number(columns = rate, decimals = 1) |>
  data_color(columns = rate, palette = "magma", reverse = TRUE)

```
report.qmd
```{python}
from great_tables import GT

(
    GT(trains)
    .cols_label(route="Route", on_time="On time", total="Total", rate="On-time rate (%)")
    .fmt_number(columns="rate", decimals=1)
    .data_color(columns="rate", palette="magma", reverse=True)
)

```
When rendered to Typst, the cell-level coloring survives, as shown in Figure 10.12. However, notice the font is now the gt/great_tables default san-serif font.
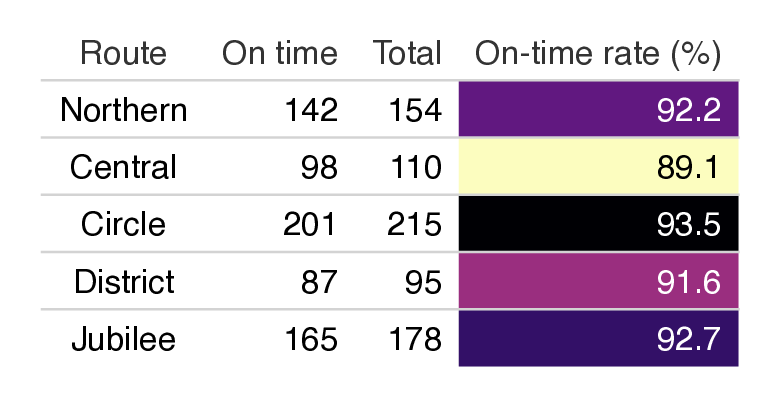
gt table rendered in Typst
Most packages that produce HTML tables offer a way to customize the styles of the tables they produce. You’ll need to look into the package documentation to find out how.
Packages that produce raw Typst tables may get the best of both worlds, inheriting the document’s fonts and styling while allowing for cell-level formatting. However, there are currently very few packages that produce raw Typst tables.
10.8.3 Long tables
When your code creates a very long table, you’ll want it to break across pages, rather than being cut off at the bottom of the page. If you haven’t set label: and tbl-cap:, i.e., it isn’t cross-referenceable, the table will break across pages by default.
If you have set label: and tbl-cap:, the table won’t be breakable by default and will overflow the page instead of breaking across it, as shown in Figure 10.13.
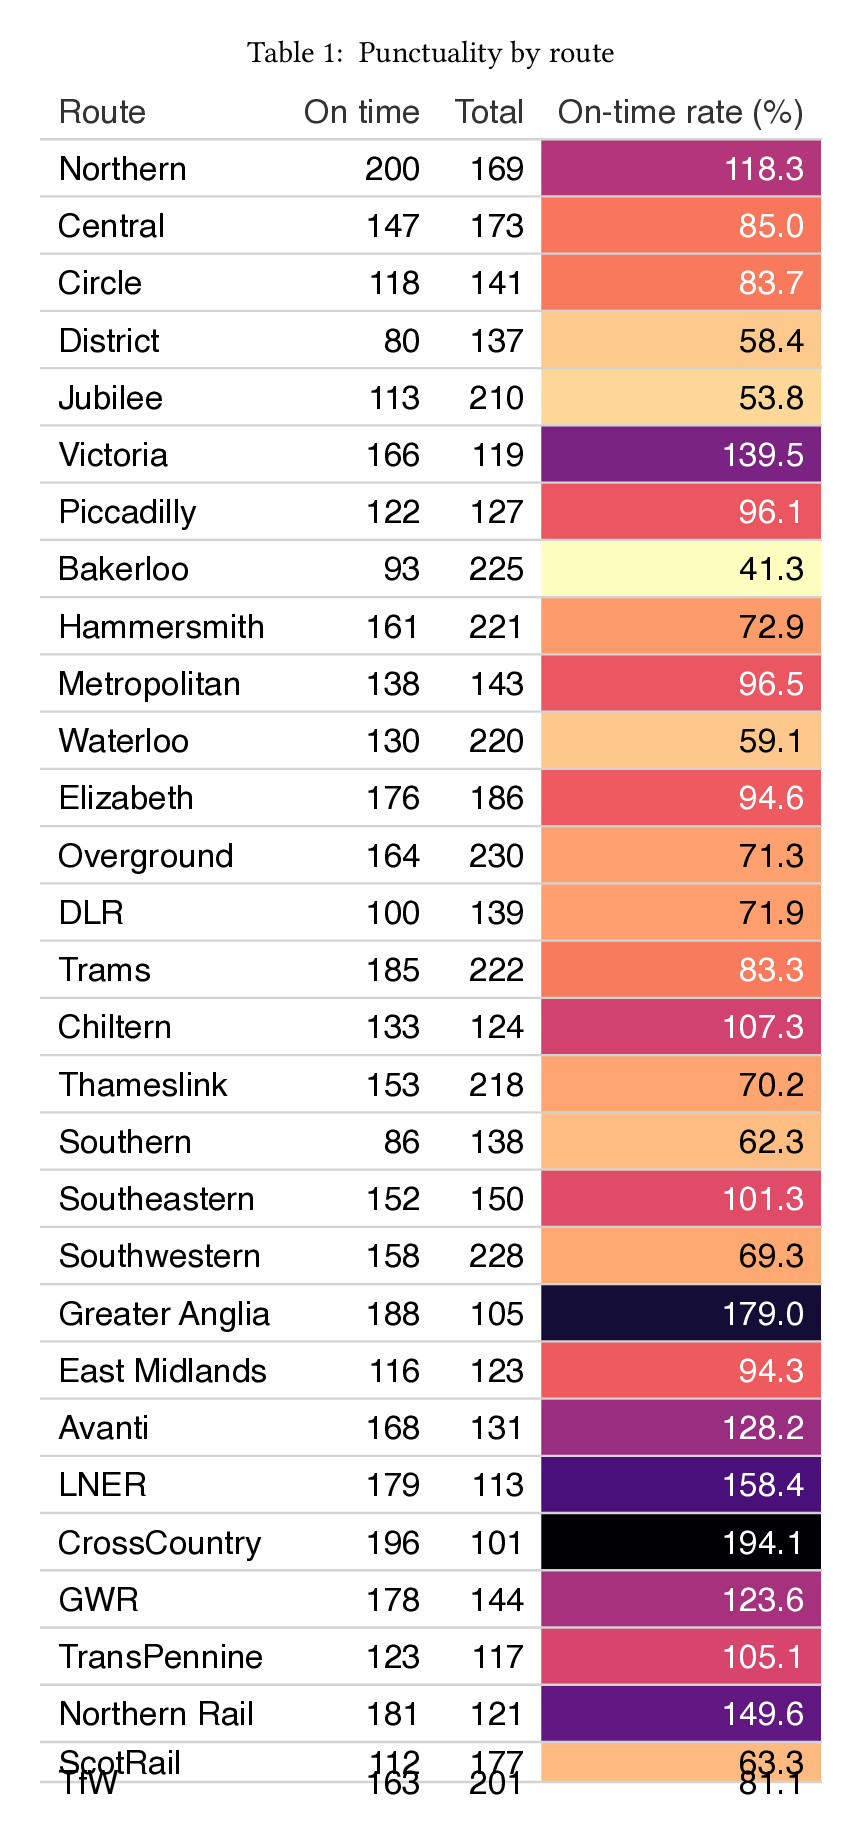
To let cross-referenceable tables break across pages, add a raw Typst block after your document header:
report.qmd
---
title: "Route Punctuality Report"
---

```{=typst}
#show figure: set block(breakable: true)
```
Now the long table flows cleanly across pages, with the table header repeated on each:
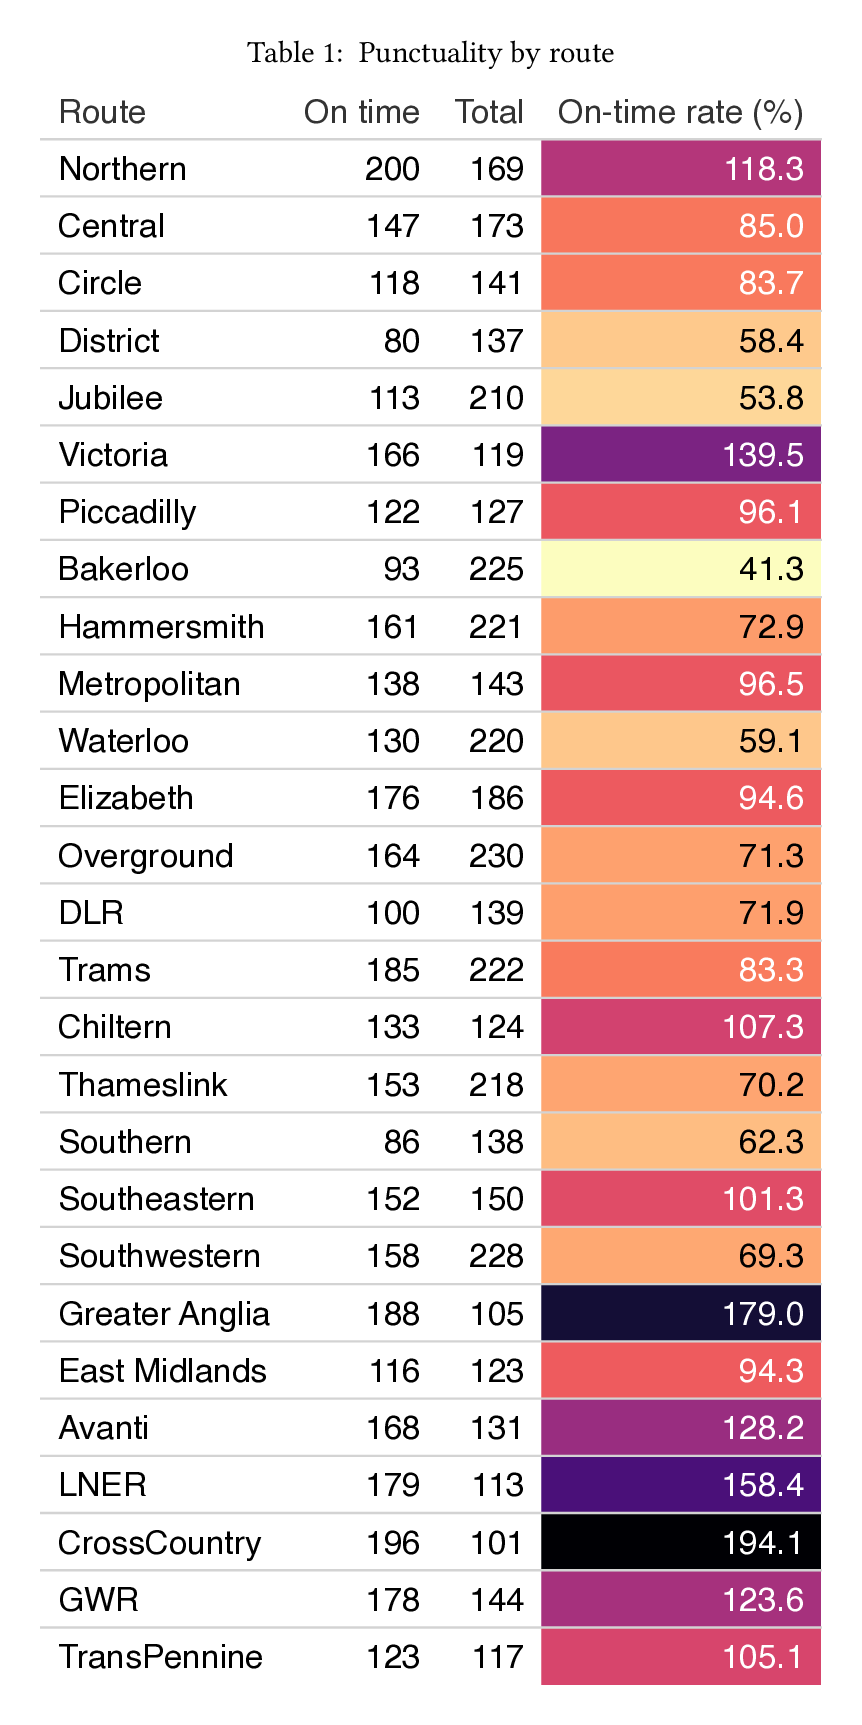
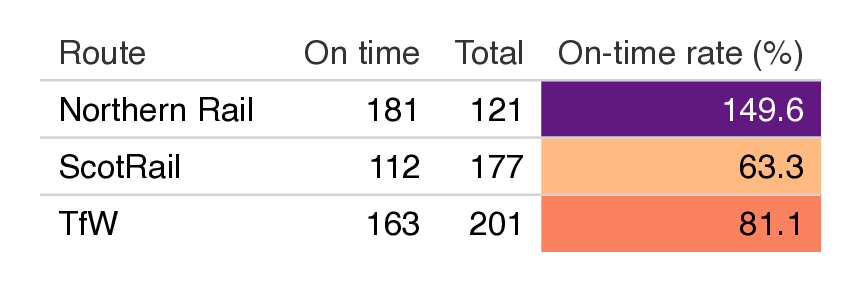
You’ll learn more about raw Typst blocks in the next section.
10.9 Raw Typst blocks
If you explore the Typst documentation, you’ll find a rich syntax that can go beyond what Quarto markdown supports. For anything that Quarto doesn’t support you can use Typst syntax directly inside a raw block (Section 12.16).
The contents of a raw block pass through to Typst without being processed by Quarto, and are ignored in any other format. For example, you can use a raw Typst block to add status badge that uses the rect, align, and text Typst functions:
report.qmd
Service status:

```{=typst}
#rect(width: 4cm, height: 1cm, fill: rgb("#2e5090"), radius: 4pt)[
  #align(center + horizon, text(white)[Normal])
]
```
Another good use case for raw blocks is to customize appearance with set and show rules, as you’ll see in Section 10.13.1.
10.10 Full-width or margin content
By default, your document content will appear in the body column of your PDF. Sometimes you may want to break out of that column and use the full page width, or put content into the right margin.
Add the .column-margin class to a fenced div to push content into the margin as an aside:
report.qmd
Peak-hour delays on the Harbour–Airport route were the largest single contributor to the Q4 miss.

::: {.column-margin}
The regulator's on-time threshold is 90%.
:::

West Loop and University Line consistently cleared 88% across all service periods.
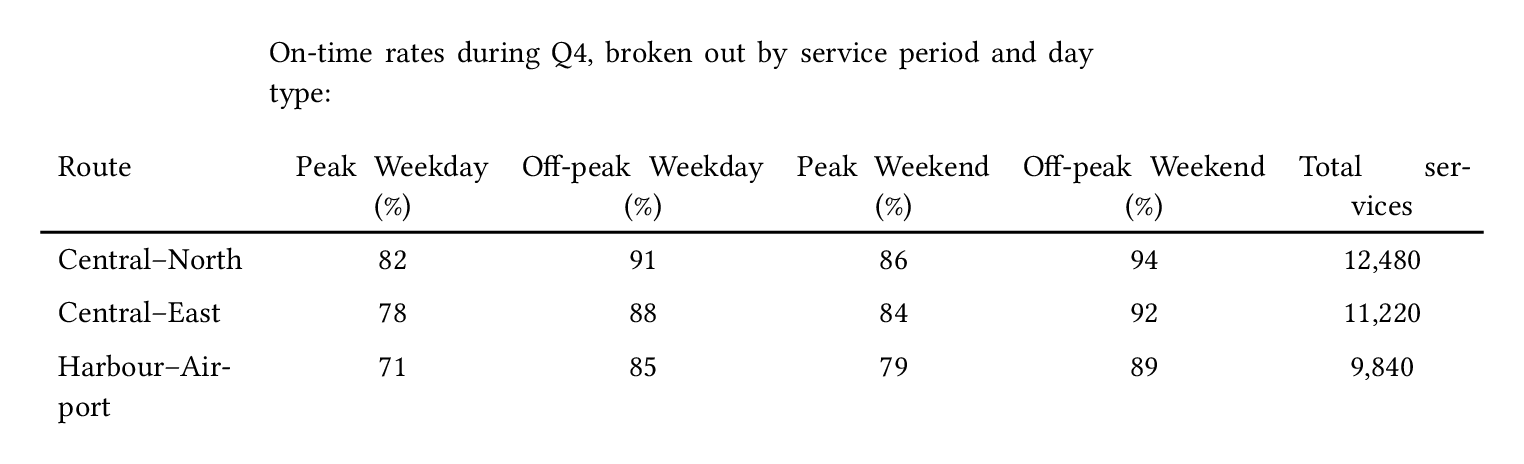
Use the .column-page class to widen content across the page, extending beyond the body text:
report.qmd
On-time rates during Q4, broken out by service period and day type:

::: {.column-page}

| Route             | Peak Weekday (%) | Off-peak Weekday (%) | Peak Weekend (%) | Off-peak Weekend (%) | Total services |
|:------------------|:----------------:|:--------------------:|:----------------:|:--------------------:|:--------------:|
| Central–North     | 82               | 91                   | 86               | 94                   | 12,480         |
| Central–East      | 78               | 88                   | 84               | 92                   | 11,220         |
| Harbour–Airport   | 71               | 85                   | 79               | 89                   |  9,840         |

:::
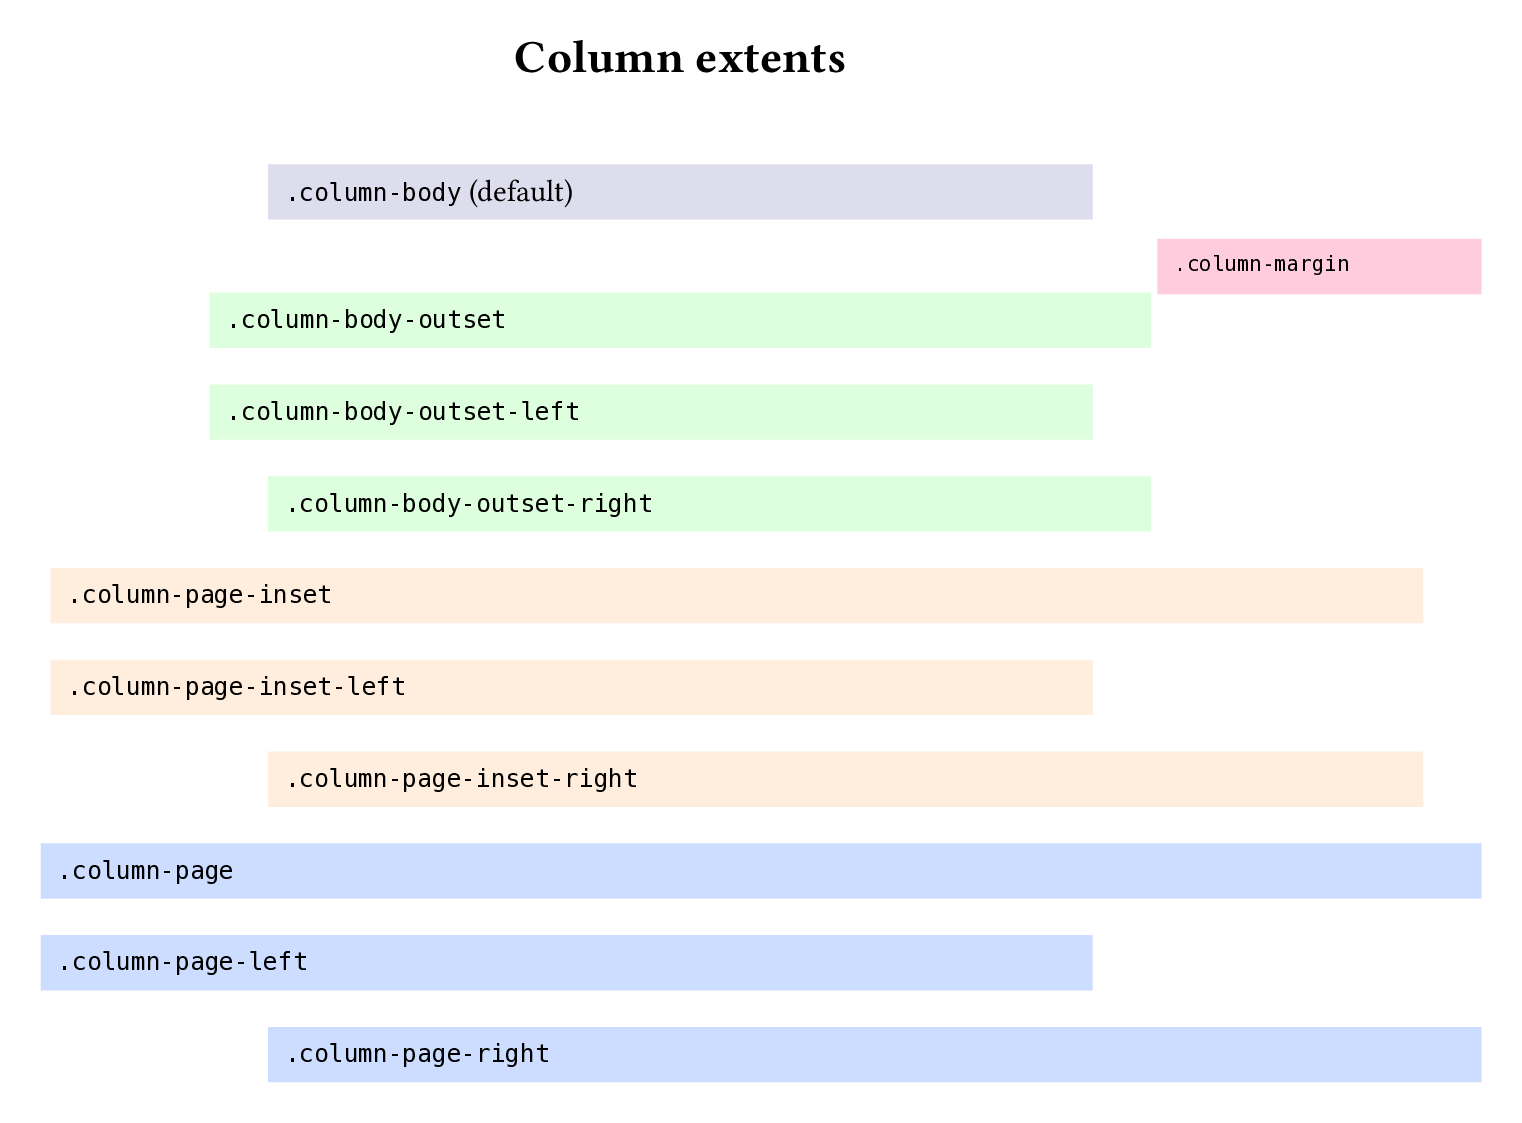
In Typst, the column classes give you four distinct widths beyond the default body:
.column-margin— content sits in the margin column.column-body-outset— slightly wider than the body, extending into the margins.column-page-inset— almost the full page width.column-page— extends to the page margins
Each of the wider three has -left and -right variants for one-sided expansion. Figure 10.18 shows the extent of each.
For document-wide defaults, set tbl-column and fig-column in the document header:
report.qmd
---
format: typst
fig-column: page
tbl-column: page
---
Both apply to every cross-referenceable table or figure in the document — markdown pipe tables, list tables, and computational outputs alike. Tables and figures without an identifier are unaffected, as are non-cross-referenceable images and tables.
When you place content outside the default body column, the layout mechanism of your document changes from a simple single body area to a layout using the Typst marginalia package to manage the margin allocation. You’ll learn more about managing this layout in Section 10.12.1.5.
10.11 Making accessible PDFs
Accessibility is about increasing the reach of your documents. A PDF that’s well-structured can be used by more people – like readers who navigate with a screen reader, who zoom to 400%, who can’t tell red from green, or who depend on assistive technology to work through a long document.
The Web Content Accessibility Guidelines (WCAG) are the most widely accepted standard for what counts as “accessible”. When a regulation says your document must be accessible, it almost always points to these guidelines. However, since the WCAG was written for the web and is deliberately technology-agnostic, it doesn’t directly map to requirements for PDFs.
For PDF documents, you’ll be more likely to work with a PDF standard. PDF/UA-1 is one such standard, supported by Typst, that translates WCAG into testable rules for PDFs. You can target this standard by setting pdf-standard: ua-1 in your document header:
report.qmd
---
title: "Route Punctuality Report"
author: "Dr. Sarah Okonkwo"
lang: en
format:
  typst:
    pdf-standard: ua-1
---
When you do so, your document is marked as targeting this standard and is checked twice during the rendering process:
By Typst itself, when it compiles the
.typto.pdf.By Quarto, which uses veraPDF to validate the resulting
.pdfagainst the PDF/UA-1 standard.
You’ll need to install veraPDF to get the second check:
Terminal
quarto install verapdfFor a document that passes validation, you’ll see the [typst] compile step completing with DONE, and a PASSED message from veraPDF:
Terminal
[typst]: Compiling train-punctuality.typ to train-punctuality.pdf...DONE

[verapdf]: Validating train-punctuality.pdf against PDF/UA1...PASSED
For a document that fails validation, you’ll see an error from the [typst] compile step along with an error from Typst that describes the failure:
Terminal
[typst]: Compiling train-punctuality-not.typ to train-punctuality-not.pdf...error: PDF/UA-1 error: missing alt text

...

ERROR: Typst compilation failed
Because the Typst compilation fails, you won’t get the .pdf output.
10.11.1 What does it mean to pass PDF/UA-1 validation?
Passing PDF/UA-1 validation is a useful first step to ensuring an accessible document, but it doesn’t mean your document is accessible. There are two big caveats to be aware of:
Passing PDF/UA-1 validation does not mean your document meets PDF/UA-1
There are rules in PDF/UA-1 that cannot be checked automatically. For example, consider the rule:
PDF/UA-1: 7.1-8:
dc:titleclearly identifies the document.
The dc:title element is set by title in your document header. Validation can check dc:title is set, but it can’t check it “clearly identifies the document”. As a human, meeting rules that require human judgment is your responsibility.
Meeting PDF/UA-1 does not mean your document meets WCAG
The rules in PDF/UA-1 cover structural requirements that are necessary for accessibility, but they don’t cover all the content-level requirements in WCAG. For example, consider the rule:
WCAG 2.1: 1.4.3 Contrast (Minimum): The visual presentation of text and images of text has a contrast ratio of at least 4.5:1, except for the following: …
This rule has no PDF/UA-1 equivalent, so you can fully meet all machine- and human-checkable PDF/UA-1 requirements without meeting WCAG. Some tools can check additional WCAG rules but these are beyond the automated checks you’ll get from Quarto.
10.11.2 Accessibility best practices
The following best practices will help you meet most PDF/UA-1 and WCAG AA requirements.
10.11.2.1 Use semantic structure
Your resulting PDF needs to tag content based on what it is, not how it looks: a section heading needs to be tagged as a heading, not just be big and bold. Quarto’s markdown encourages this naturally — when you write ## Recommendations, Quarto knows it is a second-level heading and tags it as such in the PDF. Be careful not to skip heading levels, e.g., jumping from ## to #### without an intervening ###. Skipping levels can make navigation difficult for screen readers.
10.11.2.2 Communicate a logical reading order
Quarto encourages this naturally too: the implied reading order is the same as the top-to-bottom order of elements in your .qmd. For example, a figure is “read” based on its location in your .qmd, not where it ends up in the .pdf. As long as you write your .qmd to read from top-to-bottom, you’ll meet this requirement.
10.11.2.3 Set required metadata
PDF/UA-1 validation will flag missing required metadata. For example, you must set title in your document header to pass validation.
Some metadata is filled with default values, so you’ll pass validation without setting them. One example is lang, the document language, which is set to en-US by default. If your document is written in a language other than English, set lang appropriately.
10.11.2.4 Provide alternative text for all images and equations
Validation will flag missing alt text — but you still need to write meaningful descriptions yourself. Every image and every equation must have alt text. For images, add alt text with the fig-alt attribute or code cell option (see Section 12.8). For display equations, add alt text with the alt attribute in the equation’s attribute block (see Section 10.6.1). There is currently no way to add alt text to inline math in format: typst, so avoid inline math, or use raw Typst for inline math, if you need to meet PDF/UA-1.
10.11.2.5 Use informative titles, headings, and alternative text
No automated check can tell whether a field’s content is meaningful — only that the field is set. “My document”, “Section 4”, or “chart” pass every automated check and leave your reader with nothing to navigate by. It’s your responsibility to ensure these accurately describe their content.
10.11.2.6 Use color choices that are readable
No automated check covers color or contrast — these are your responsibility. Foreground and background must have sufficient contrast, both in textual elements (body text, headings, code blocks, syntax highlighting) and in any parts of a figure important for understanding it (points, bars, lines, key icons, etc.). Meaning shouldn’t depend on color alone — supplement with labels, patterns, or shape.
10.12 Customizing appearance
While the default appearance of format: typst is great for many “working” documents, you’ll likely need to customize the appearance for published documents.
In this section, you’ll learn how to customize the page layout (Section 10.12.1) with document options, and fonts and colors with brand.yml (Section 10.12.2).
If none of the techniques in this section meet your needs, you might need the techniques in Section 10.13.
10.12.1 Page layout
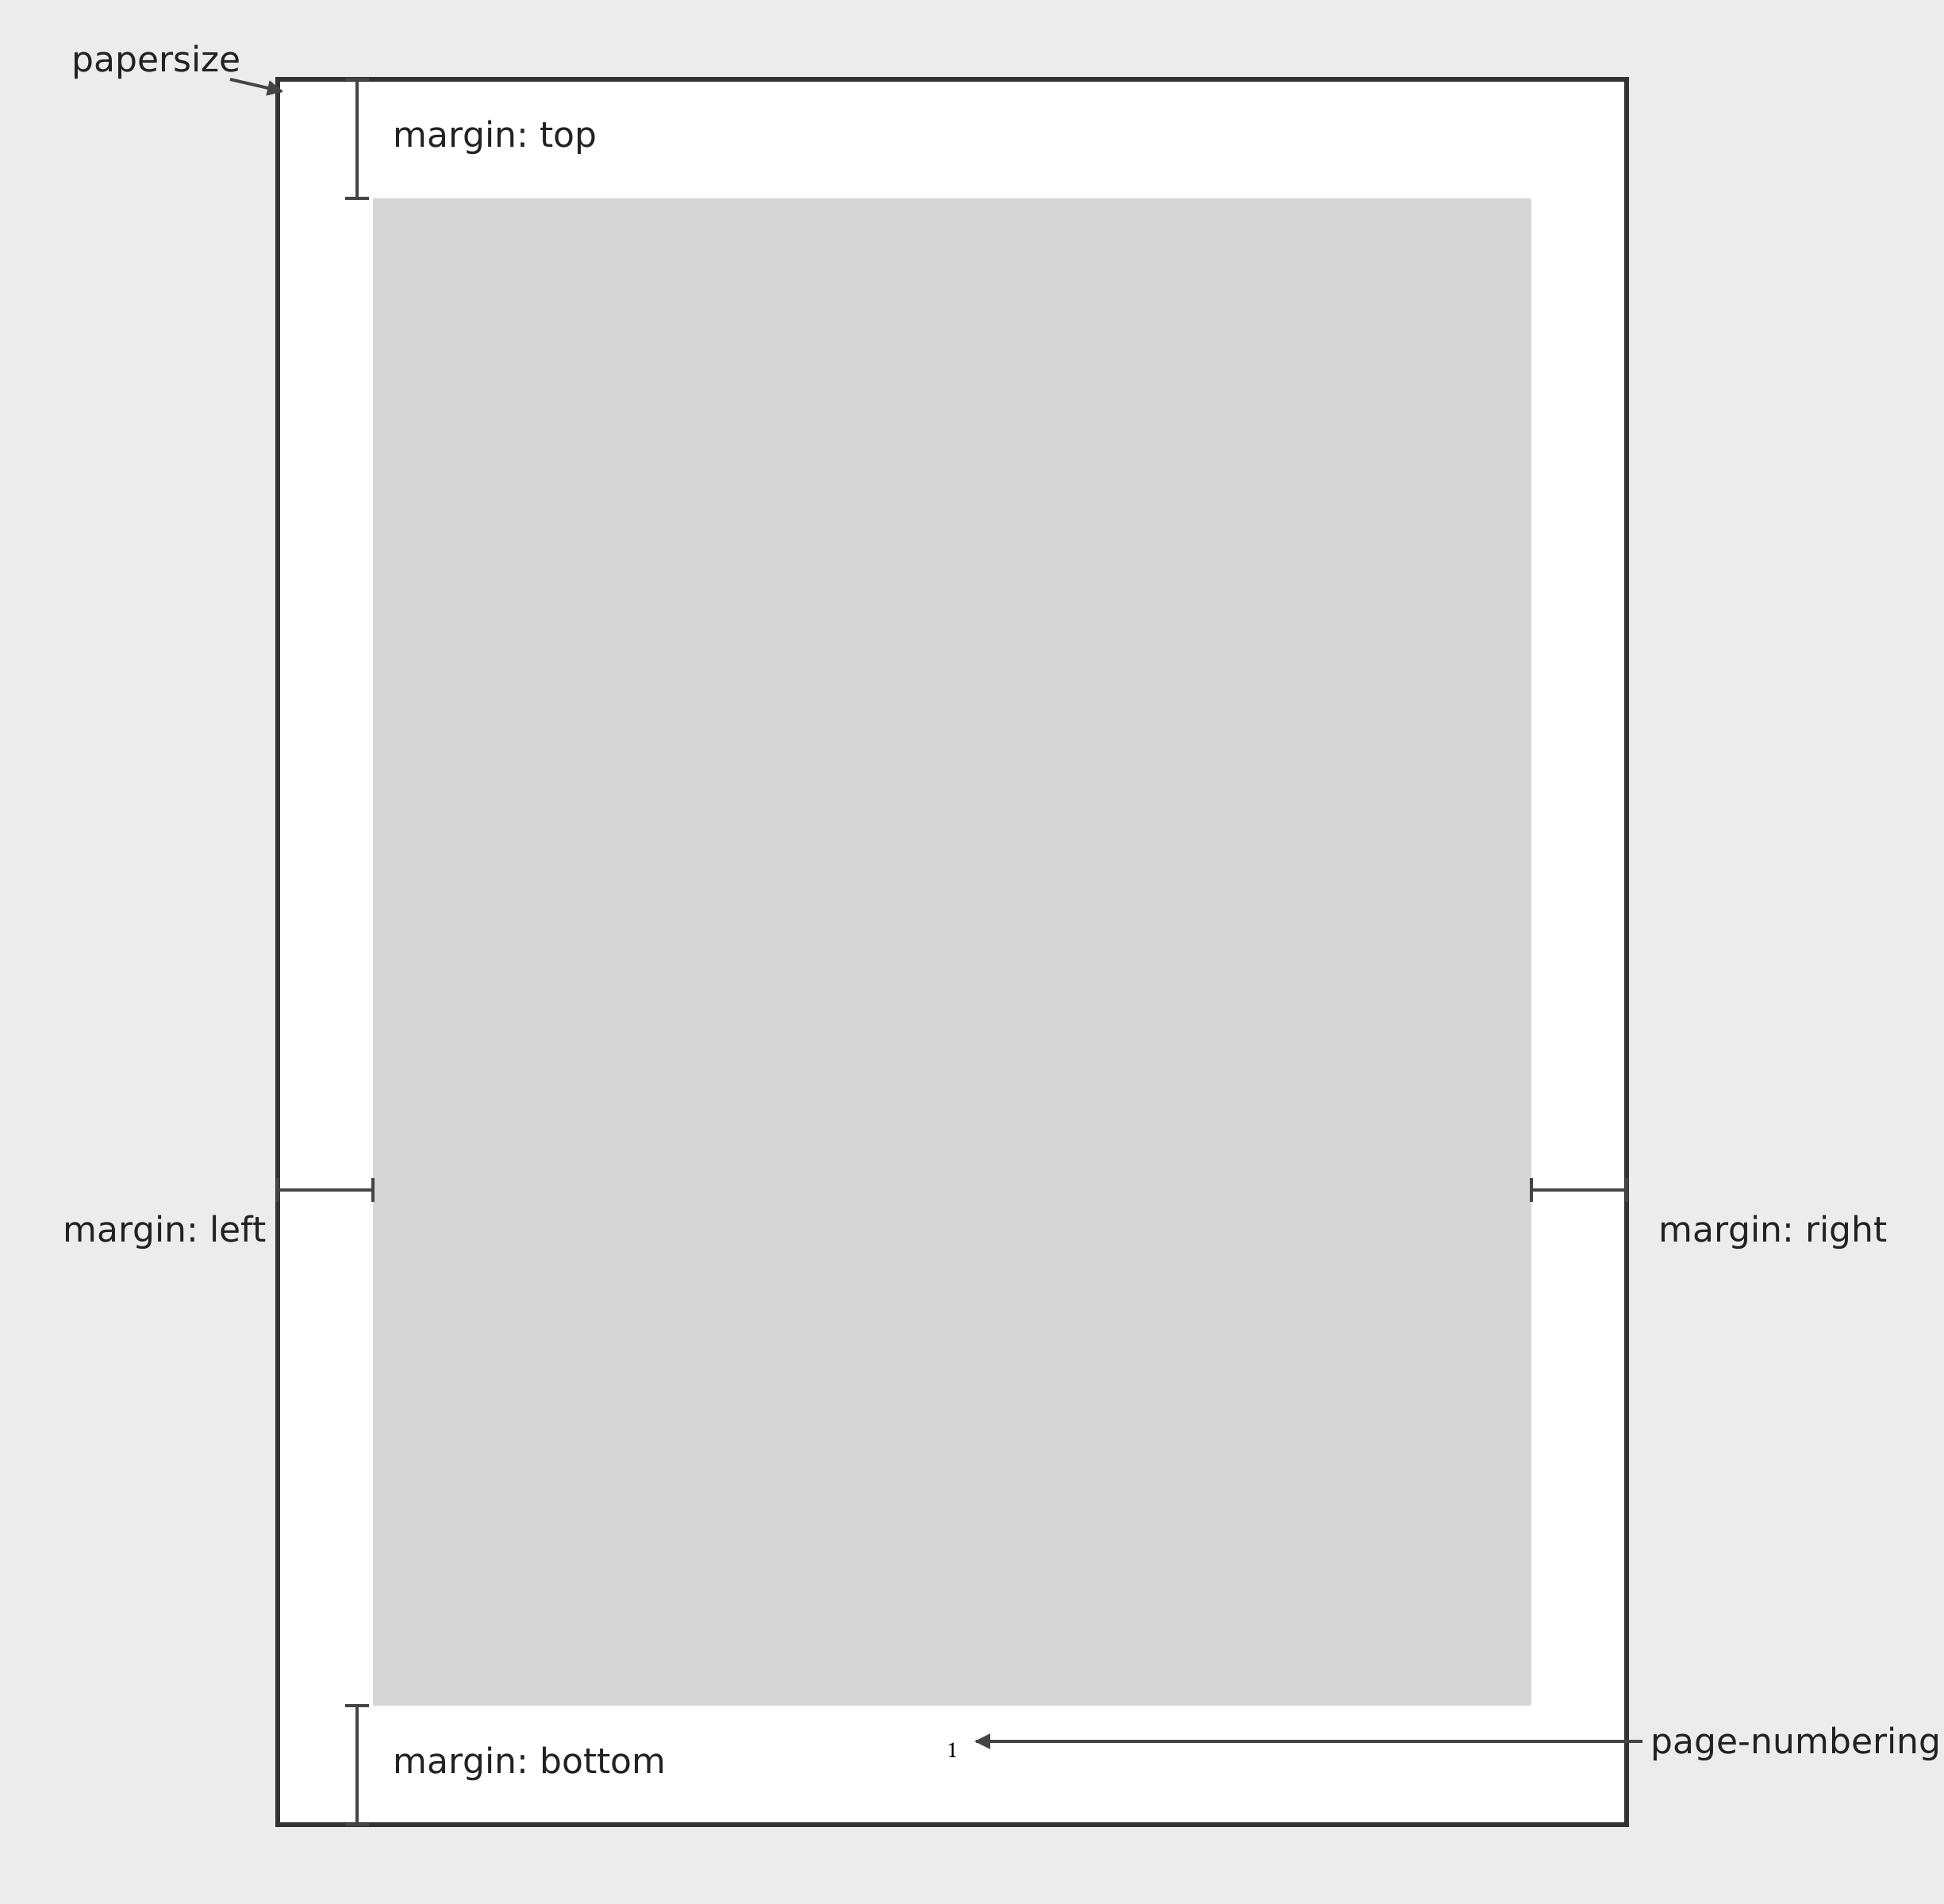
You can control some aspects of your page layout by specifying options in your document header. Figure 10.19 illustrates those that apply regardless of how you lay out your body content: papersize, margin, and page-numbering.
Two other options control how body content is arranged as illustrated in Figure 10.20. These options don’t work well together so you should pick one approach:
Arrange body content automatically into multiple columns with
columnsExplicitly arrange content into columns with the
.column-*classes (Section 10.10) and control their layout withmargin-geometry.

columns
margin-geometrycolumns, and using the .column-* classes with margin-geometry.
The following sections go into the details of each option.
10.12.1.1 papersize
Set paper size with papersize:
report.qmd
---
format:
  typst:
    papersize: a4
---
Use any of Typst’s supported paper sizes like a4, a5, us-legal, jis-b5 etc. The default is us-letter.
10.12.1.2 margin
Set page margins with margin. You can specify any combination of top, bottom, left, right, or the shortcuts x (for left and right) and y (for top and bottom):
report.qmd
---
format:
  typst:
    margin:
      top: 2cm
      bottom: 2cm
      left: 3cm
      right: 3cm
---
You can use anything Typst will recognize as a relative length and includes simple lengths with units like 2cm, 1in, or 254mm, ratios like 10%, and combinations like 25% + 1cm.
10.12.1.3 page-numbering
Use page-numbering to set the page number format (or false to suppress page numbers):
report.qmd
---
format:
  typst:
    page-numbering: "1 / 1"
---
page-numbering follows Typst’s numbering-pattern syntax — 1 for the current page, a second 1 for the total.
The footer region, where page numbers appear, is inside the bottom margin. If your margins need to be completely free of content, consider increasing the bottom margin to account for the room the page number needs.
Quarto doesn’t expose document options for page headers or running titles in Typst output. For those, use a raw Typst block with a set rule (Section 10.13.1).
10.12.1.4 columns
Set the number of columns the body text is arranged in with columns:
report.qmd
---
format:
  typst:
    columns: 2
---
Content will flow automatically into two columns. These columns don’t combine well with full width or margin content, so avoid using .column-* classes.
10.12.1.5 margin-geometry
When you place content outside the body column, e.g. in the margin or across the full page-width, as described in Section 10.10, the layout switches to use the Typst marginalia package.
In this layout, the left and right side of the pages are split into several regions as illustrated in Figure 10.21. The margin-geometry option is used to control the widths of each region. You can specify widths for far, width and separation under inner and outer corresponding to the left and right side of the page respectively.
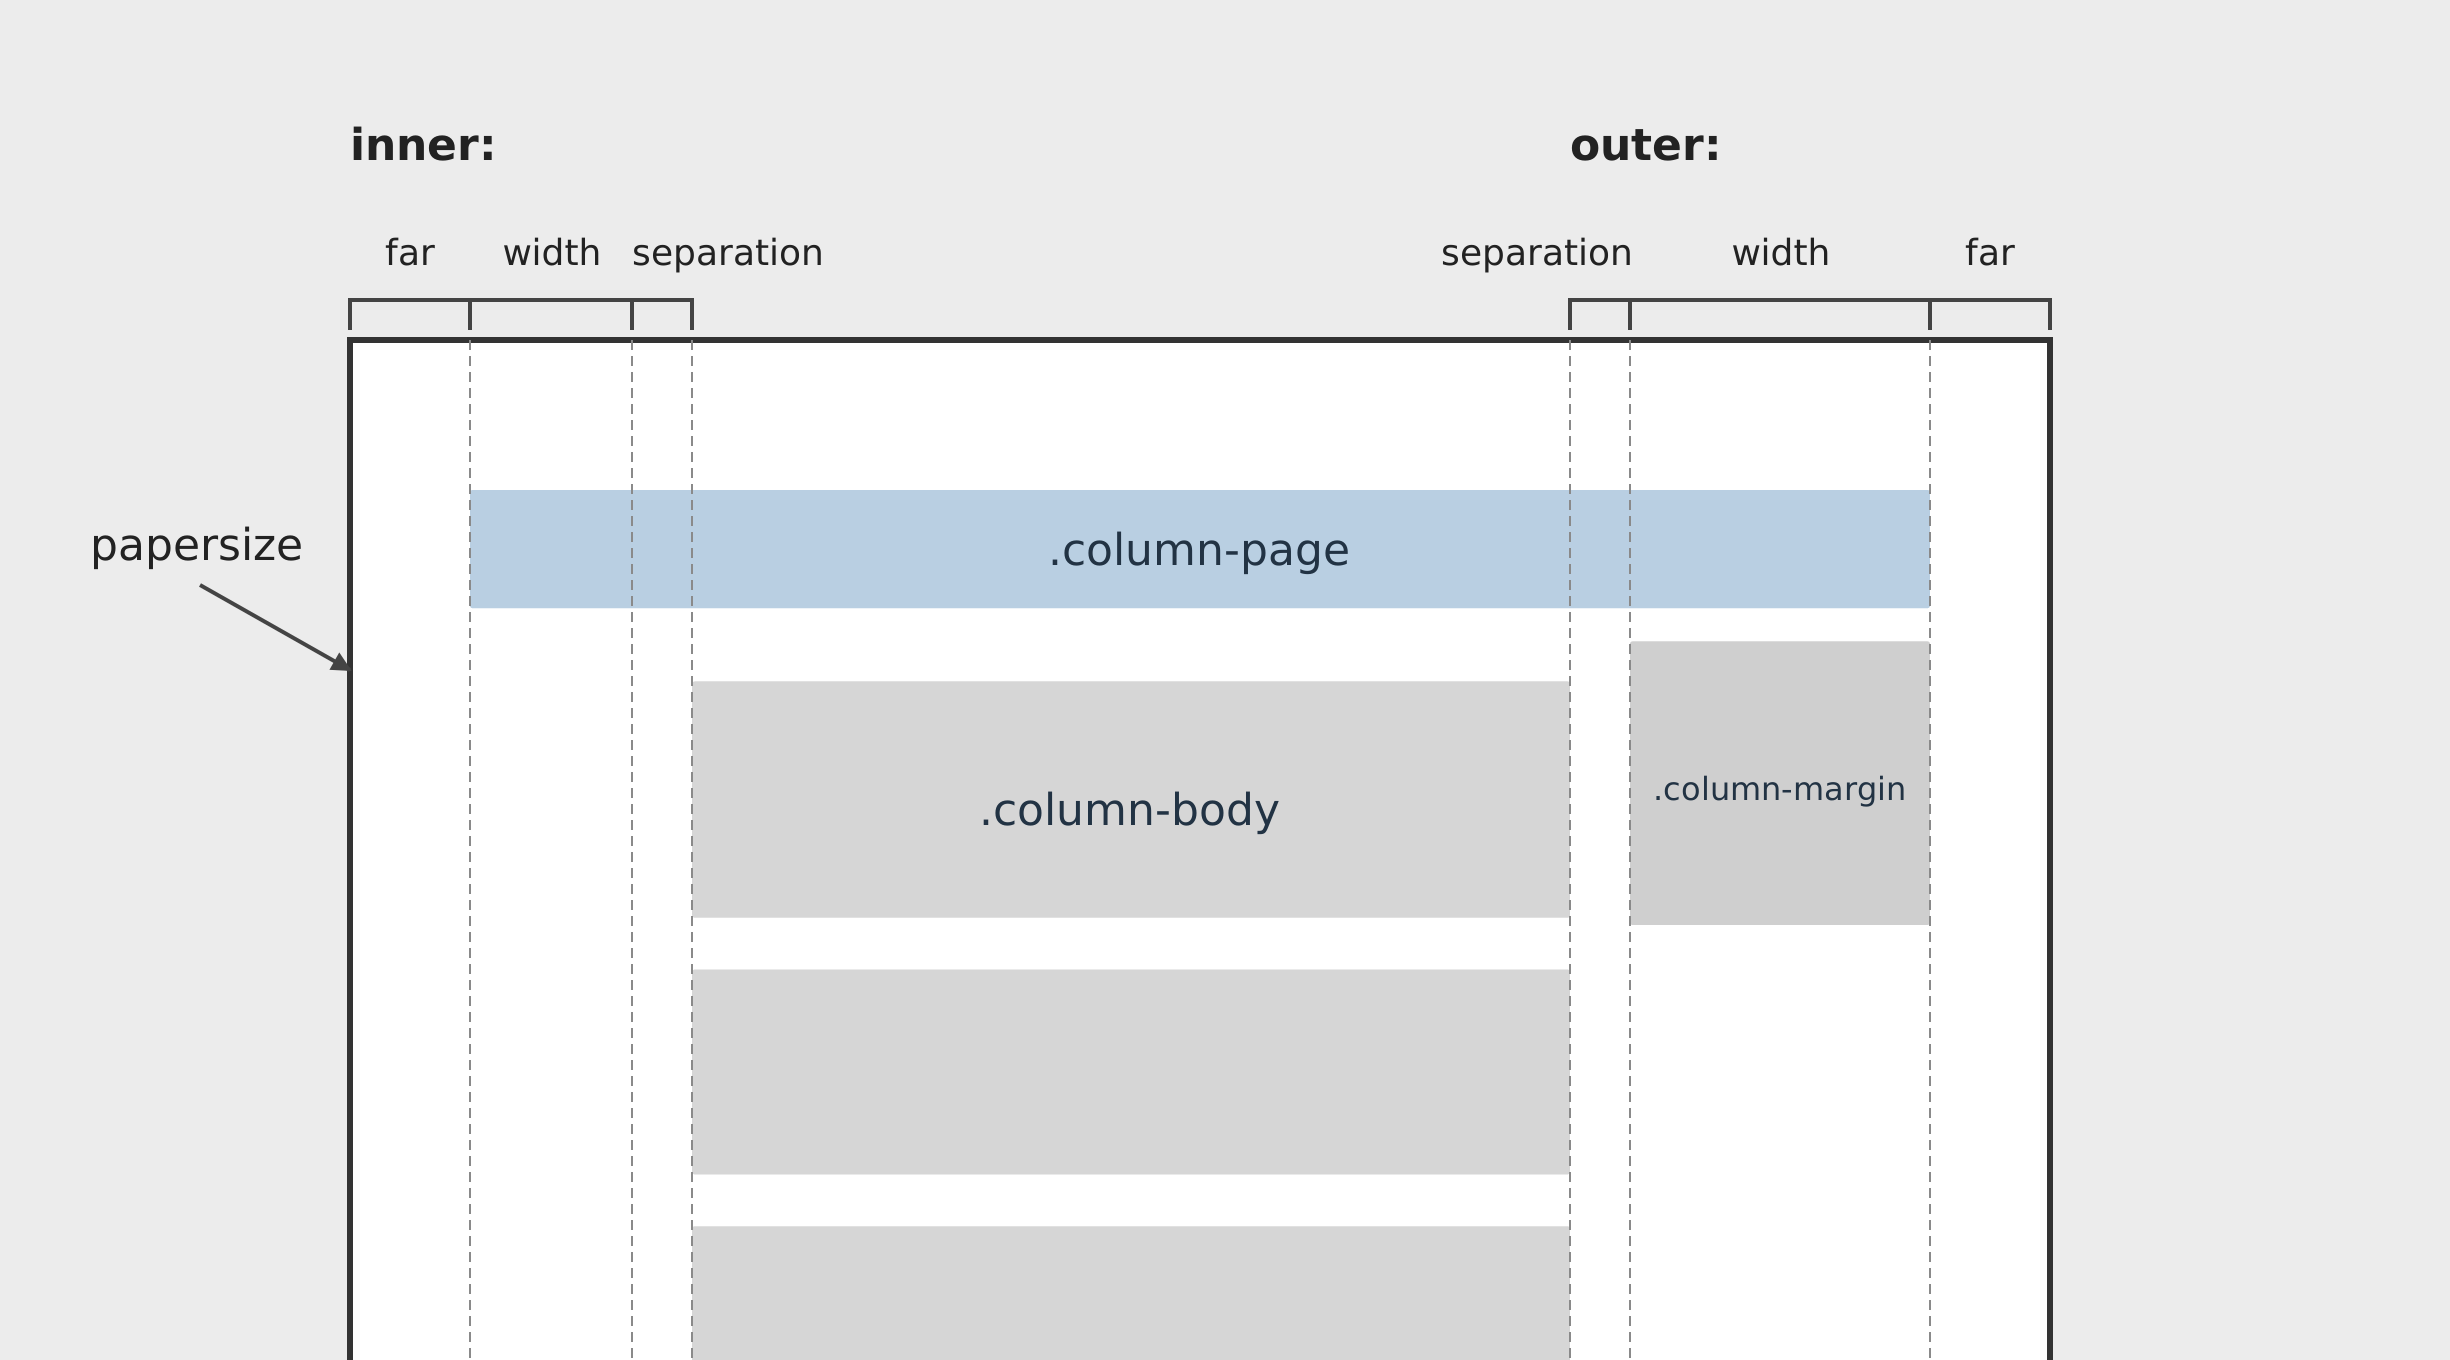
margin-geometry controls on each side: far, width, and separation.
For example, to remove the inner margin column and use a symmetric one-inch far margin on both sides:
report.qmd
---
format:
  typst:
    margin-geometry:
      inner:
        far: 1in
        width: 0in
        separation: 0.25in
      outer:
        far: 1in
        width: 1.5in
        separation: 0.25in

---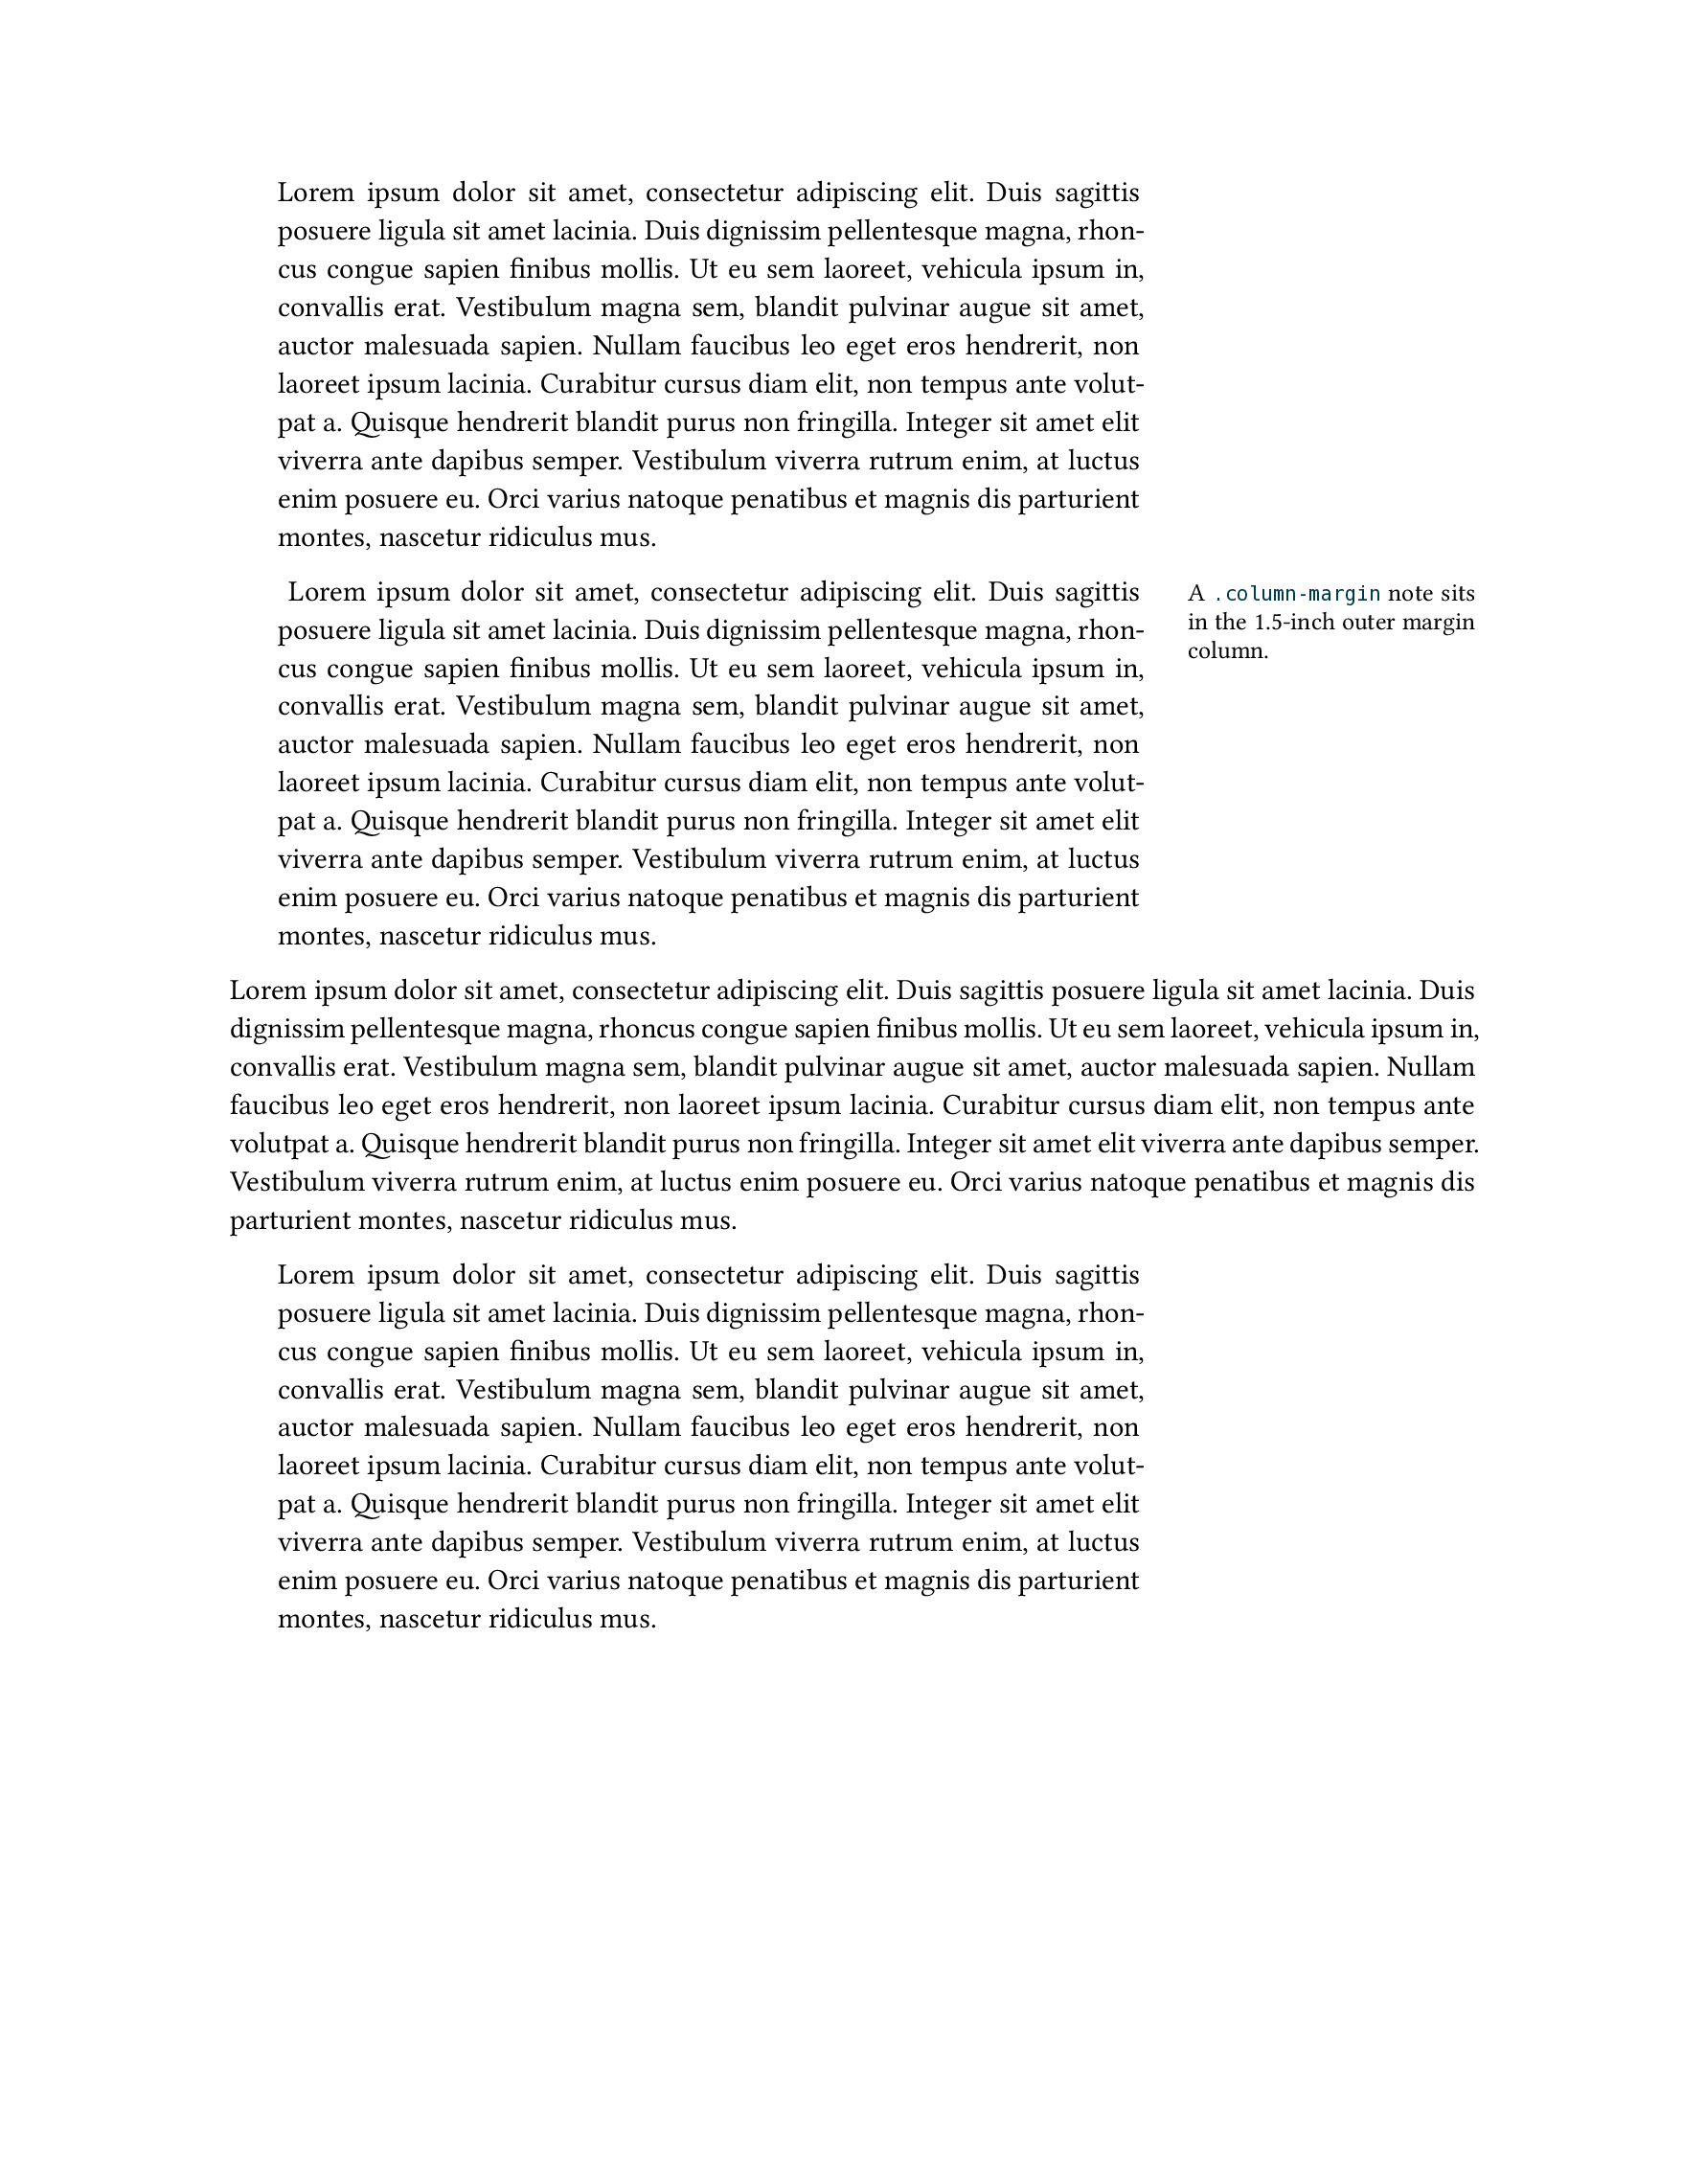
.column-body text is inset with no inner margin column, the .column-margin note sits in the 1.5-inch outer column, and the .column-page block reaches the 1-inch far margin on each side.
The width of the region corresponding to .column-body is whatever remains of the page width as specified by papersize. So, in this example, using the default papersize of us-letter, the body area is:
\[ \underset{\text{page width}}{8.5^"} - \left(\underset{\texttt{far}}{2(1^")} + \underset{\texttt{separation}}{2(0.25^")} + \underset{\texttt{outer.width}}{1.5^"}\right) = 4.5^" \]
Top and bottom margins are controlled with the margin option as shown in Section 10.12.1.2.
10.12.2 Colors and fonts with brand
The easiest way to customize fonts and colors is to use brand.yml. One option is to use a standalone brand file, _brand.yml:
_brand.yml
color:
  background: "#fdf6e3"
  foreground: "#073642"
  primary: "#b58900"
If _brand.yml is in the same directory as your report, or at your Quarto project root, Quarto will pick it up automatically and apply it to your document.
Alternatively, you can specify brand in your document header under brand:
report.qmd
---
brand:
  color:
    background: "#fdf6e3"
    foreground: "#073642"
    primary: "#b58900"
---In this section, we focus on defining your own colors and fonts, but you might need to use organizational ones. If your organization has a brand repository, you can bring in into your project with the use brand command,
For example, for a brand repository on GitHub at github.com/org/repo use:
Terminal
quarto use brand org/repoCheck out the Quarto documentation on use brand for getting brand from other locations.
If your external brand defines a light and dark brand, your PDF document will use the light one by default. You can select the dark one with brand-mode:
report.qmd
---
format:
  typst:
    brand-mode: dark
---
10.12.2.1 Colors
The most salient colors are controlled by the color variables background, foreground, and primary:
_brand.yml
color:
  background: "#fdf6e3"
  foreground: "#073642"
  primary: "#b58900"
brand to set background, foreground, and primary
As you can see in Figure 10.23, background and foreground control the page color and font color respectively and primary is used for links. In this example, primary doesn’t have great contrast with the background. You can set an explicit link color, and a decoration, with the link option under typography:
_brand.yml
color:
  background: "#fdf6e3"
  foreground: "#073642"
  primary: "#b58900"
typography:
  link:
    color: "#2e5090"
    decoration: underline
link color and decoration in addition to background, foreground, and primary
Figure 10.24 has much better contrast, and the underline marks the link clearly.
As soon as you have a few colors, set a color palette to name them. This makes it easier to reuse each color in multiple places:
_brand.yml
color:
  palette:
    paper: "#fdf6e3"
    ink: "#073642"
    gold: "#b58900"
    navy: "#2e5090"
  background: paper
  foreground: ink
  primary: gold
typography:
  link:
    color: navy
    decoration: underline
If you alter background and your document includes code blocks, you’ll generally also want to set the code-block background with typography.monospace-block.background-color. Pair it with a syntax-highlighting theme whose token colors contrast against the background you picked — for example, a11y-dark for a dark background:
_brand.yml
color:
  palette:
    paper: "#fdf6e3"
    ink: "#073642"
    gold: "#b58900"
    navy: "#2e5090"
    charcoal: "#1e1e2e"
  background: paper
  foreground: ink
  primary: gold
typography:
  link:
    color: navy
    decoration: underline
  monospace-block:
    background-color: charcoal
report.qmd
---
format:
  typst:
    syntax-highlighting: a11y-dark
---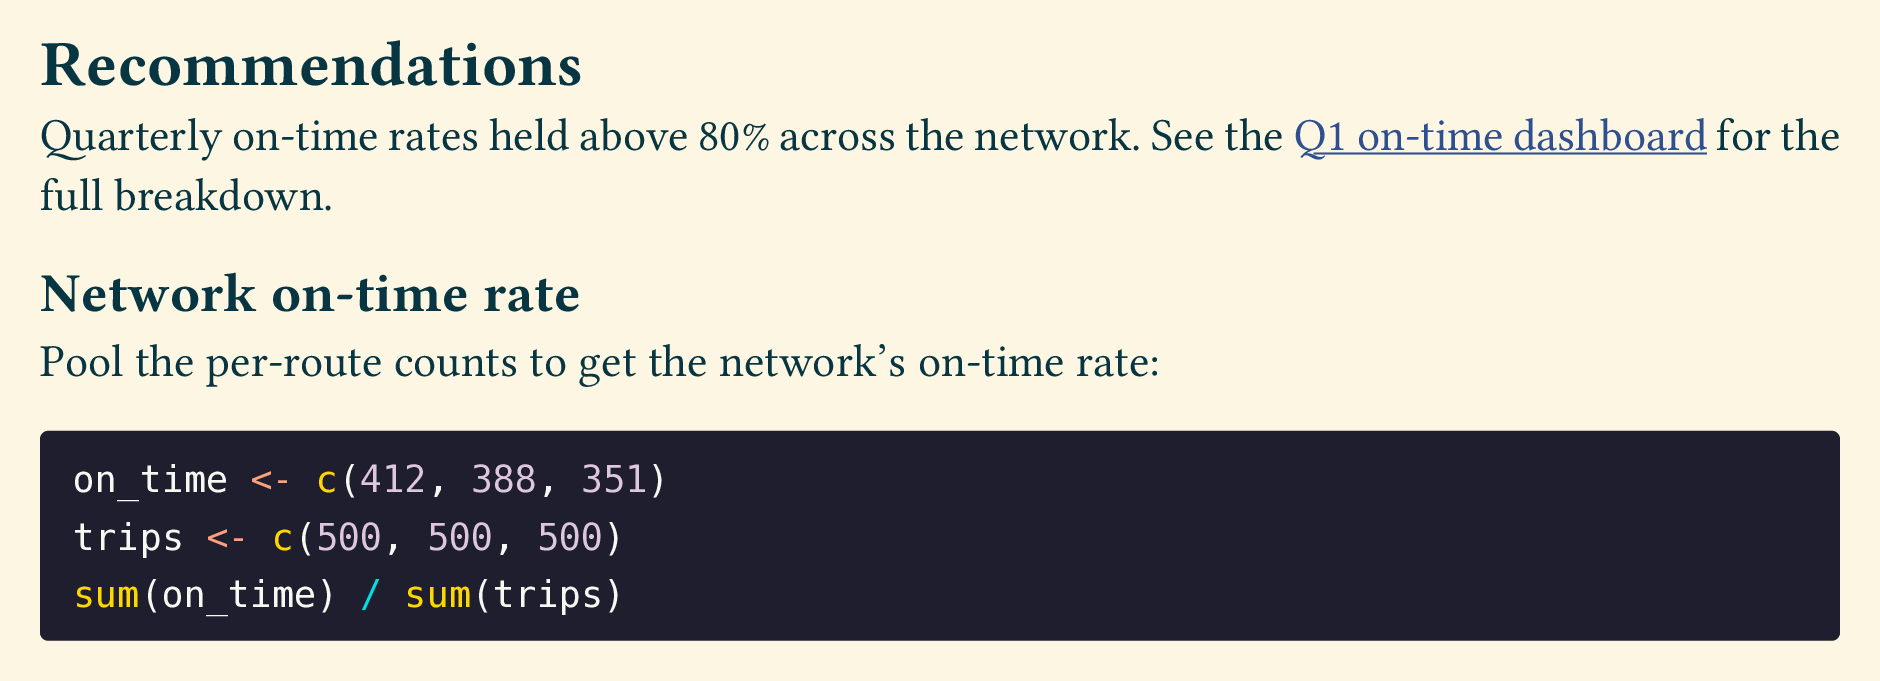
a11y-dark syntax highlighting
Highlighting themes you set in syntax-highlighting are designed for either a light or dark background. To maintain sufficient contrast between your code and its background, don’t use a theme designed for a light background with a dark background, or vice versa.
The themes a11y, arrow, atom-one, ayu, breeze, github, and gruvbox all have a dark variant, which you can select by appending -dark to the theme name.
Be aware that some syntax highlighting themes explicitly set a background color (e.g., github), and you cannot alter it via brand.
10.12.2.2 Fonts
To specify fonts, use fonts under typography to describe the family and source. Set source to be google or bunny to fetch fonts from online font repositories, or system for a font that’s already installed.
You can then provide family to other typography keys to assign the font to the corresponding elements. For example, you could use a different font for base, headings and monospace:
_brand.yml
typography:
  fonts:
    - family: EB Garamond
      source: google
    - family: Barlow
      source: google
    - family: JetBrains Mono
      source: google
  base: EB Garamond
  headings: Barlow
  monospace: JetBrains Mono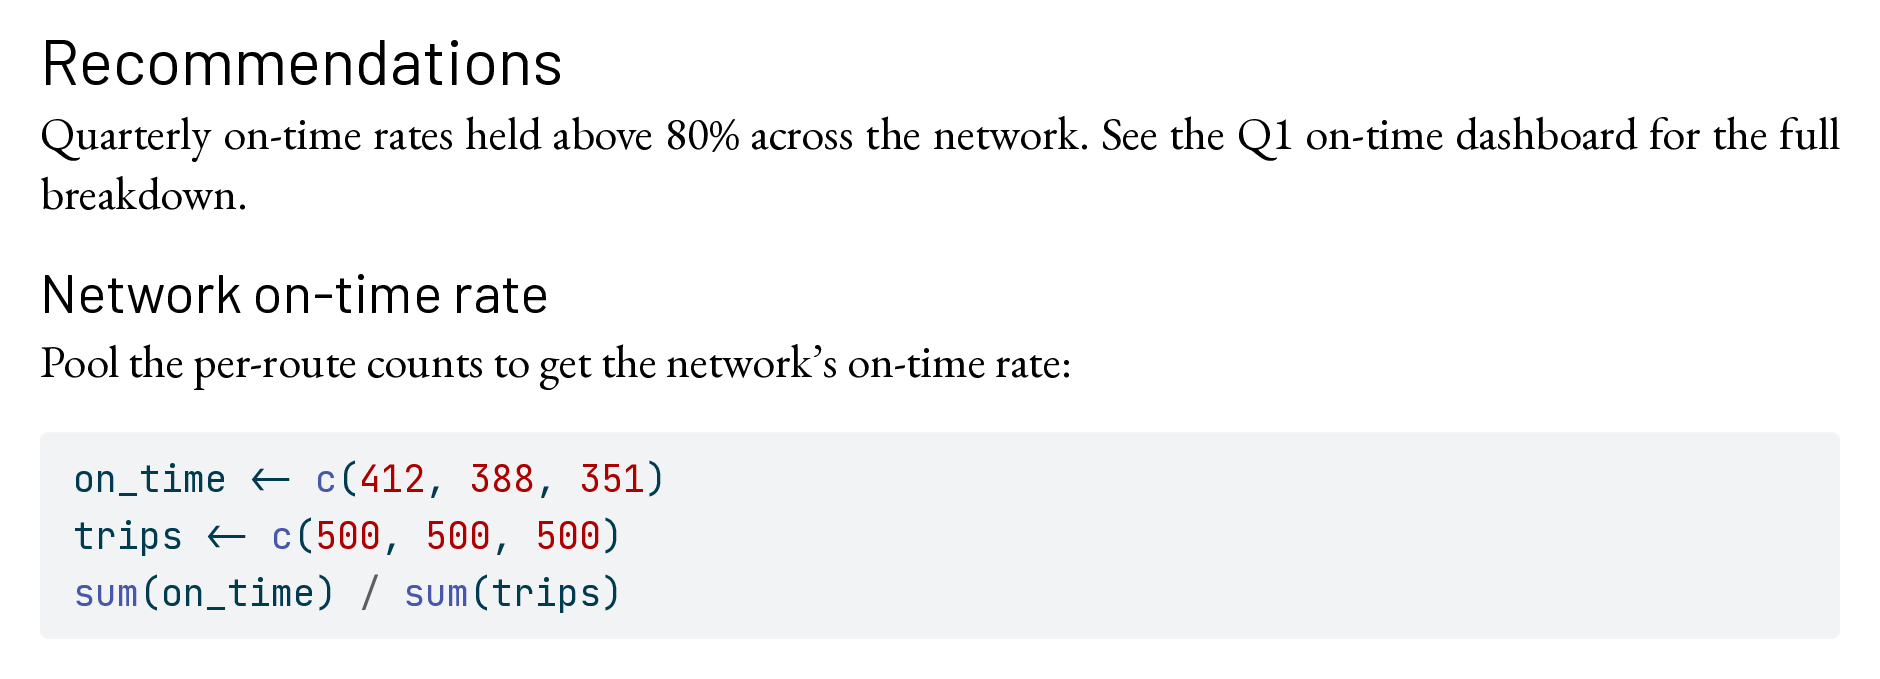
The monospace option covers both inline and block code. To target them separately, use monospace-inline and monospace-block.
We’ve illustrated color and typography independently, but you can set both in one _brand.yml to style colors and fonts together, as in Figure 10.27.
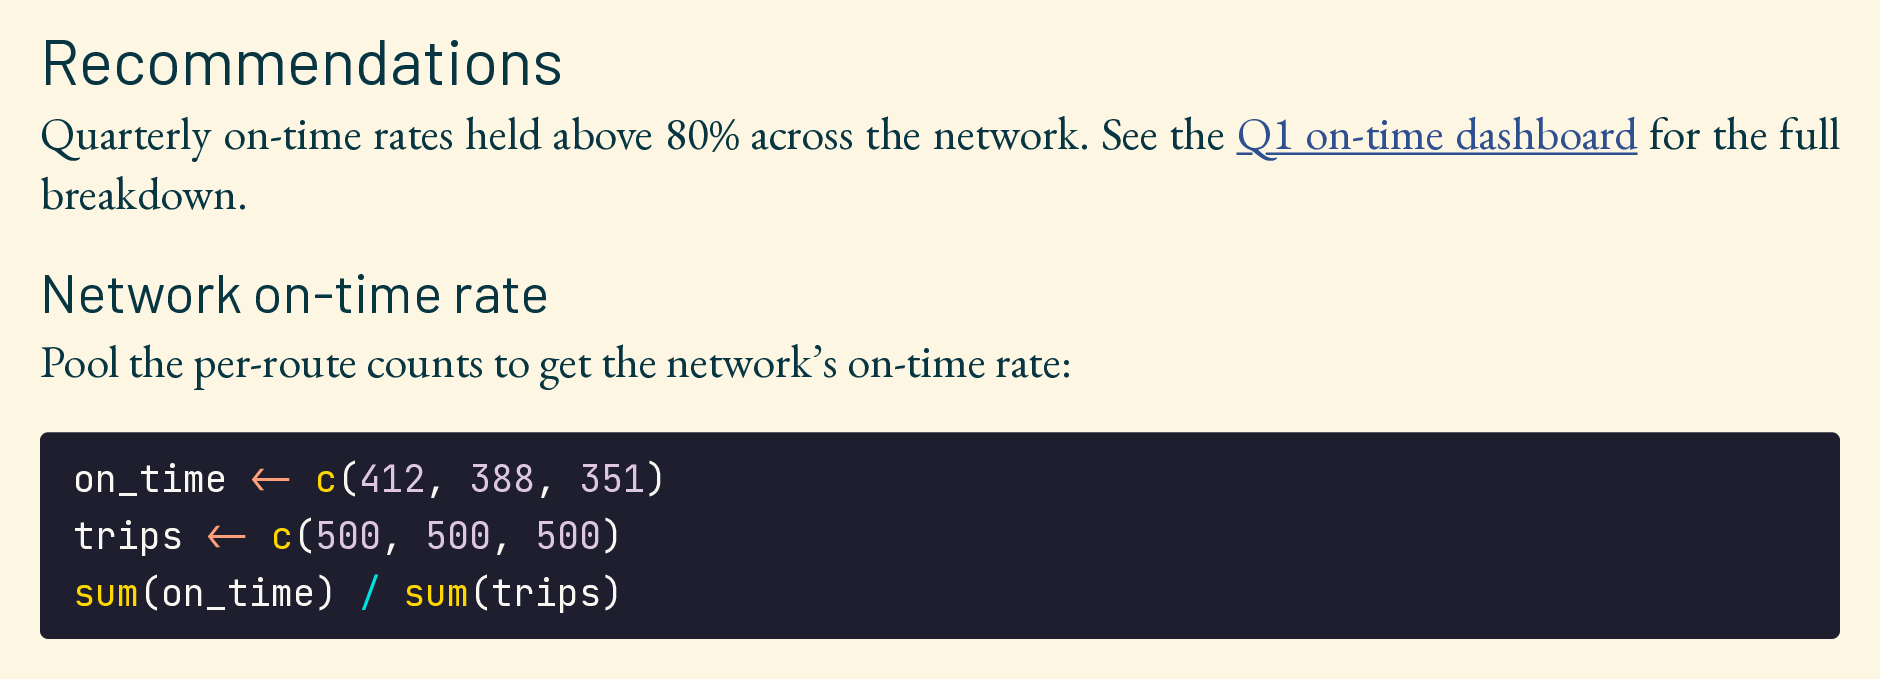
_brand.yml
10.13 Advanced customization
Most of the time, the strategies in Section 10.12 will be enough to produce a document that meets your needs, but they have limitations. When you need to customize something beyond what document options and brand can do, you’ll need to use Typst syntax to achieve your goals.
You’ll learn about two approaches in this section:
Using raw Typst blocks in the body of your document to write set and show rules (Section 10.13.1)
Editing the template partials to customize the Typst that surrounds your document body (Section 10.13.2).
We consider both advanced techniques, and you can safely skip this section if you are happy with the way your document looks.
10.13.1 Use raw Typst
Typst provides its own styling mechanism through what are known as set and show rules. You can use this mechanism directly in your document by defining these rules in a raw Typst block.
In the following sections, we’ll give you a feel for the kind of styling adjustments you can make with set and show rules. To achieve specific adjustments, you’ll need to learn some Typst syntax basics. A good place to start is the Typst tutorial followed by reading the Syntax, Styling and Scripting sections in the Typst Reference.
10.13.1.1 Set rules
Every element you see in your PDF is the result of calling a Typst function. Set rules are a way to change the default arguments for these functions. For example, the page() function is called to layout content on pages. It takes arguments for things like paper size, margin, numbering, header and footer. If you wanted a header on your pages, you could use a set rule on page to set the header argument to your document title:
report.qmd
```{=typst}
#set page(header: "Route Punctuality Report")
```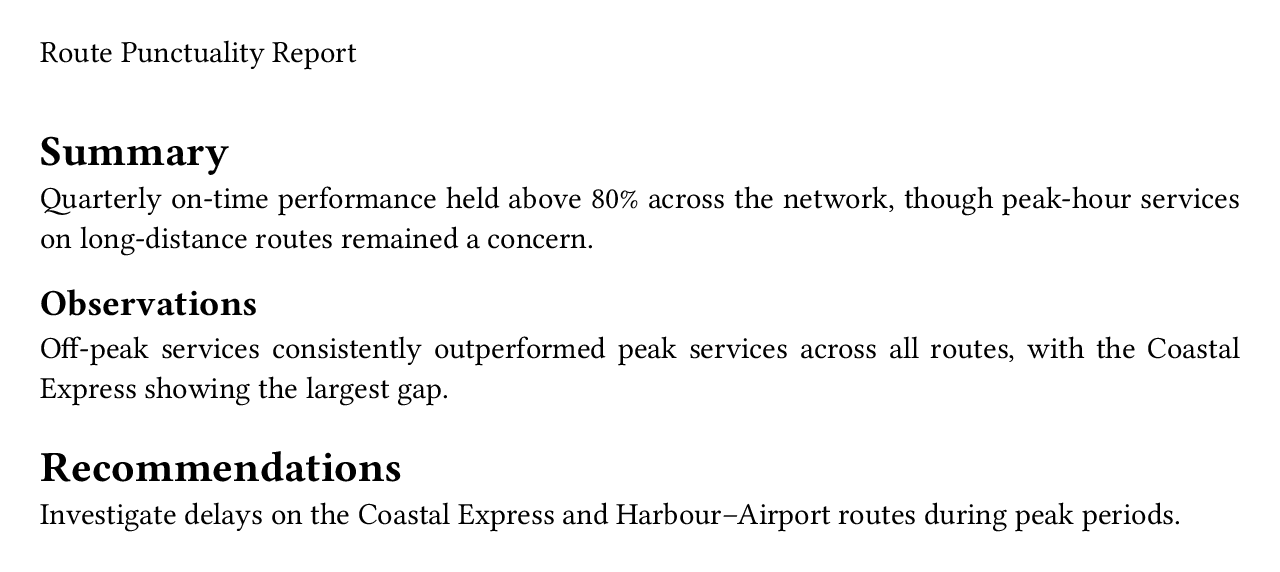
#set page() starts a new page
Typst treats #set page() as a page break — the current page ends, and the new settings take effect on the following page. A raw block at the top of your content with #set page() starts a new page after the title block with the new defaults. To reach the first page, override the page.typ partial instead (see Custom templates).
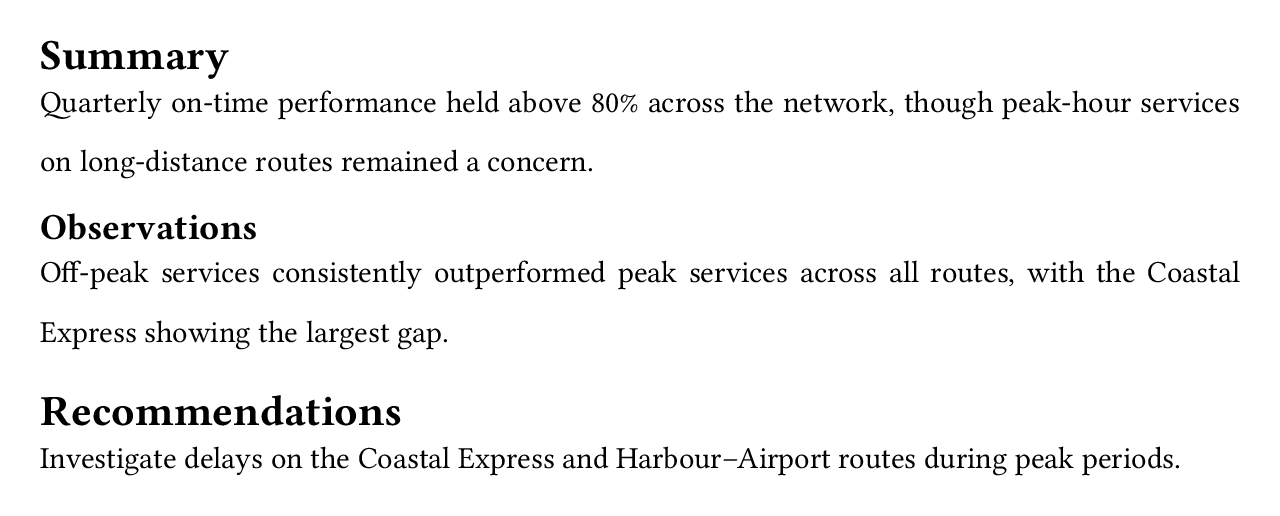
As another example, the par() function is called on every paragraph of text. It has arguments for things like spacing between lines (leading), spacing between paragraphs (spacing), justification (justify) and hanging indents (hanging-indents). You could double the line spacing from the default of 0.65em with a set rule on par():
report.qmd
```{=typst}
#set par(leading: 1.3em)
```
At the finest level, any text, regardless of where it appears, flows through the text() function. The text() function has arguments controlling the appearance of text like color (stroke and fill), font properties (font, weight, style, size and stretch) and many more.
10.13.1.2 Show rules
Show rules allow you to set the defaults for a function within the scope of another. For example, the headings in your document are created with the heading() function. The heading() function takes arguments for things like the level of the heading, how it should be numbered etc, but not how it appears. To control the appearance of a heading, you use set rules for the appropriate elements inside a show rule on heading().
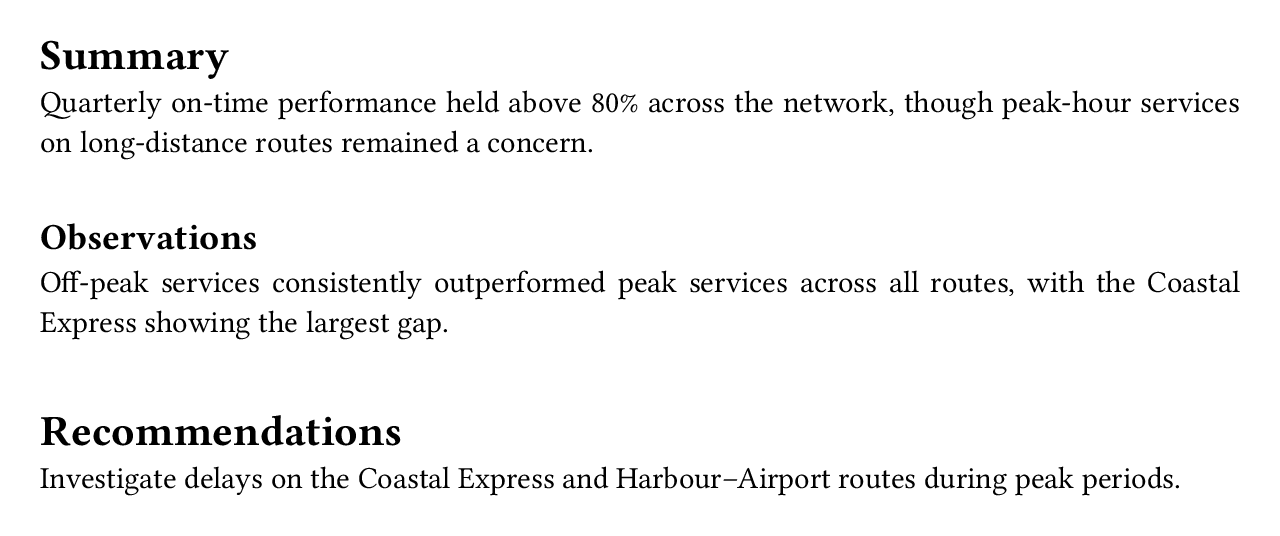
For example, the space above and below a heading is controlled by the above and below parameters of the block() function. To increase the space above a heading you use a show rule on heading() combined with a set rule on block which sets the above argument:
report.qmd
```{=typst}
#show heading: set block(above: 2em)
```
You can narrow the target of a show rule by appending .where() with a condition for the element. For example, heading() has a level argument. You could style level-2 headings to be italic with:
report.qmd
```{=typst}
#show heading.where(level: 2): set text(style: "italic")
```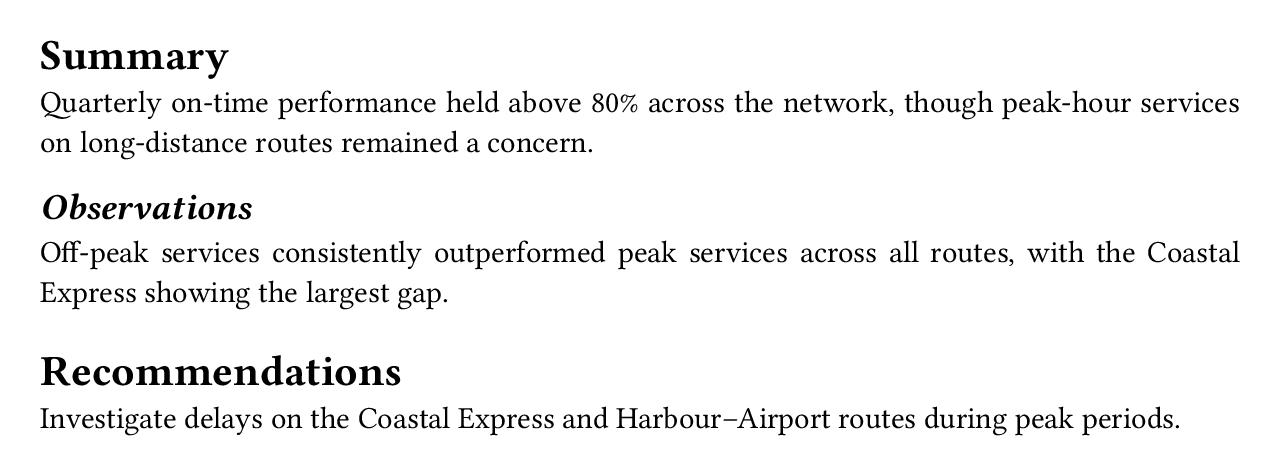
Quarto’s Typst format defaults to shift-heading-level-by: -1. This means the show rule above that targets a Typst level-2 heading, will apply to headings you’ve written in your markdown as level-3 headings, e.g. ### Observations
Quarto exposes your brand colors to Typst via the brand-color dictionary. If you’ve set a primary color, for example in _brand.yml:
_brand.yml
color:
  primary: "#2e5090"
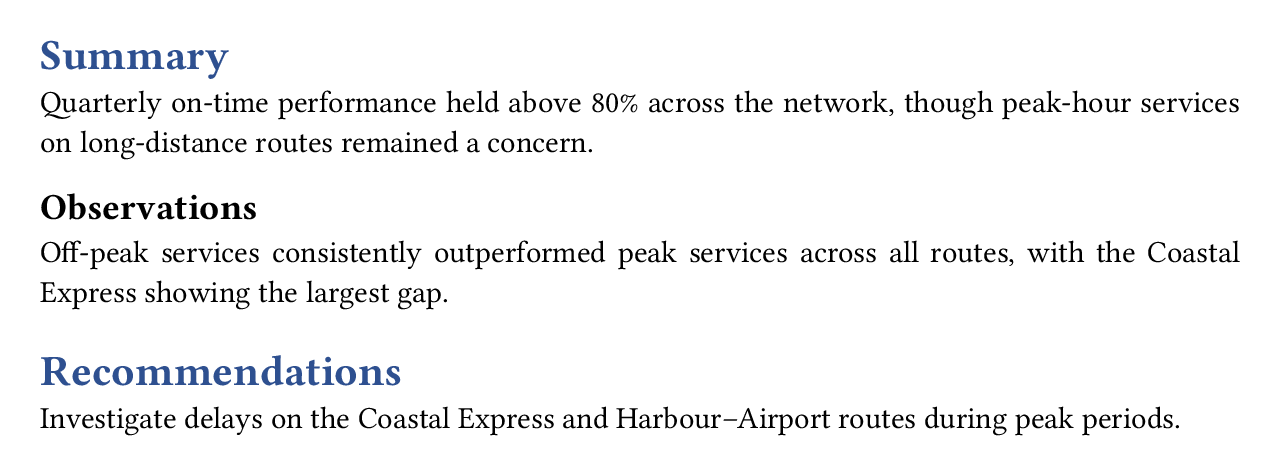
You can access that color in raw Typst blocks with brand-color.primary. For example, you could have only first-level headings appear using your primary color by using a show rule on headings that targets only level: 1 with a set rule on text() setting fill to brand-color.primary:
report.qmd
```{=typst}
#show heading.where(level: 1): set text(fill: brand-color.primary)
```
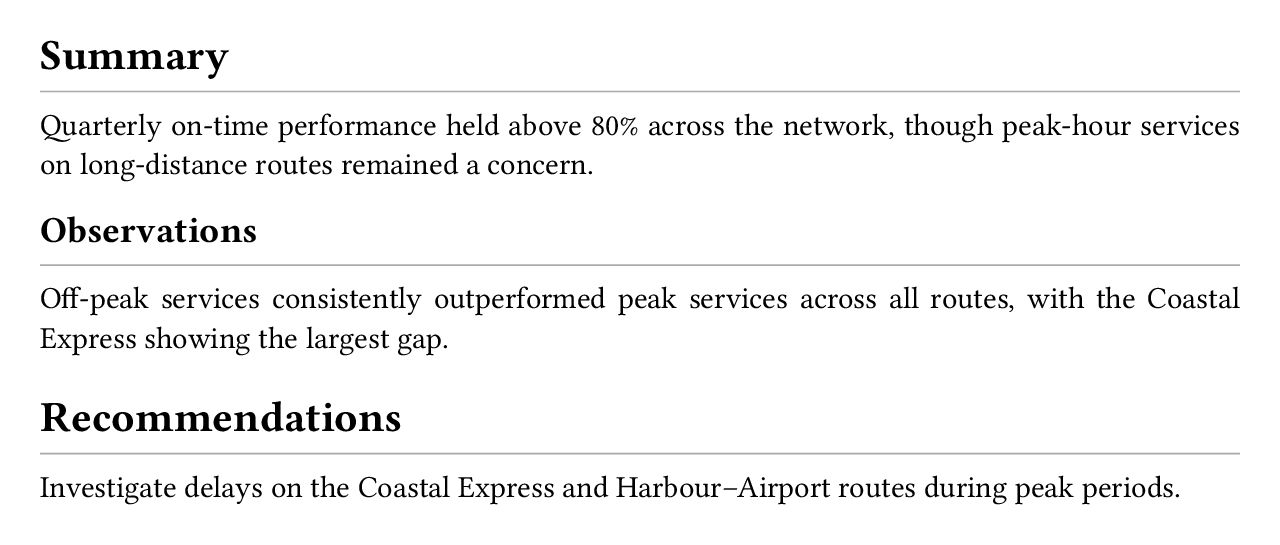
You can also provide custom functions as show rules. These functions take an existing element as input and can return anything, but you’ll usually return a transformed version of the input. As an example, you could place a horizontal rule beneath every heading by returning the original heading followed by a line():
report.qmd
```{=typst}
#show heading: it => [
  #it
  #block(above: 0em, line(length: 100%, stroke: 0.5pt + gray))
]
```
If you’ve got a lot of set and show rules you are defining in raw blocks at the top of your content, you might want to move them into a separate file and include them with include-before in your document header:
report.qmd
---
format:
  typst:
    include-before: styles.typ
---
Where styles.typ contains your Typst with set and show rules (and no raw Typst block syntax):
styles.typ
#set par(leading: 1.3em)
#show heading: set block(above: 2em)
#show heading.where(level: 1): set text(fill: brand-color.primary)
10.13.2 Custom templates
When the set and show rules aren’t enough, you can further customize by providing your own template partials. Partials reach places a raw Typst block in your document body can’t:
- You can apply set and show rules to content that appears before your body, i.e., the title block.
- You can provide your own definition for how the title, authors, date, etc. should be laid out.
- You can reference options you’ve set in the document header.
- You can add new kinds of document elements.
When you render, Quarto (with Pandoc) translates your markdown to Typst syntax, but that translated content isn’t a complete document on its own. Quarto wraps it in boilerplate: setting up the page layout from your document options, building a title block from your metadata, and supplying the Typst infrastructure behind callouts, cross-references, and footnotes. The boilerplate and your content together form an intermediate .typ file, which Typst compiles to .pdf.
Quarto breaks this boilerplate into small pieces, the partials, assembled by a single template file. As Figure 10.34 shows, template.typ is the master partial: it includes each of the others in order, wrapping your translated content ($body$). Two do the central work: typst-template.typ defines an article() function that adds the title block, table of contents, and base styling, while typst-show.typ calls it with a show rule, passing your metadata and everything below the rule (body, footnotes, bibliography) in as doc.
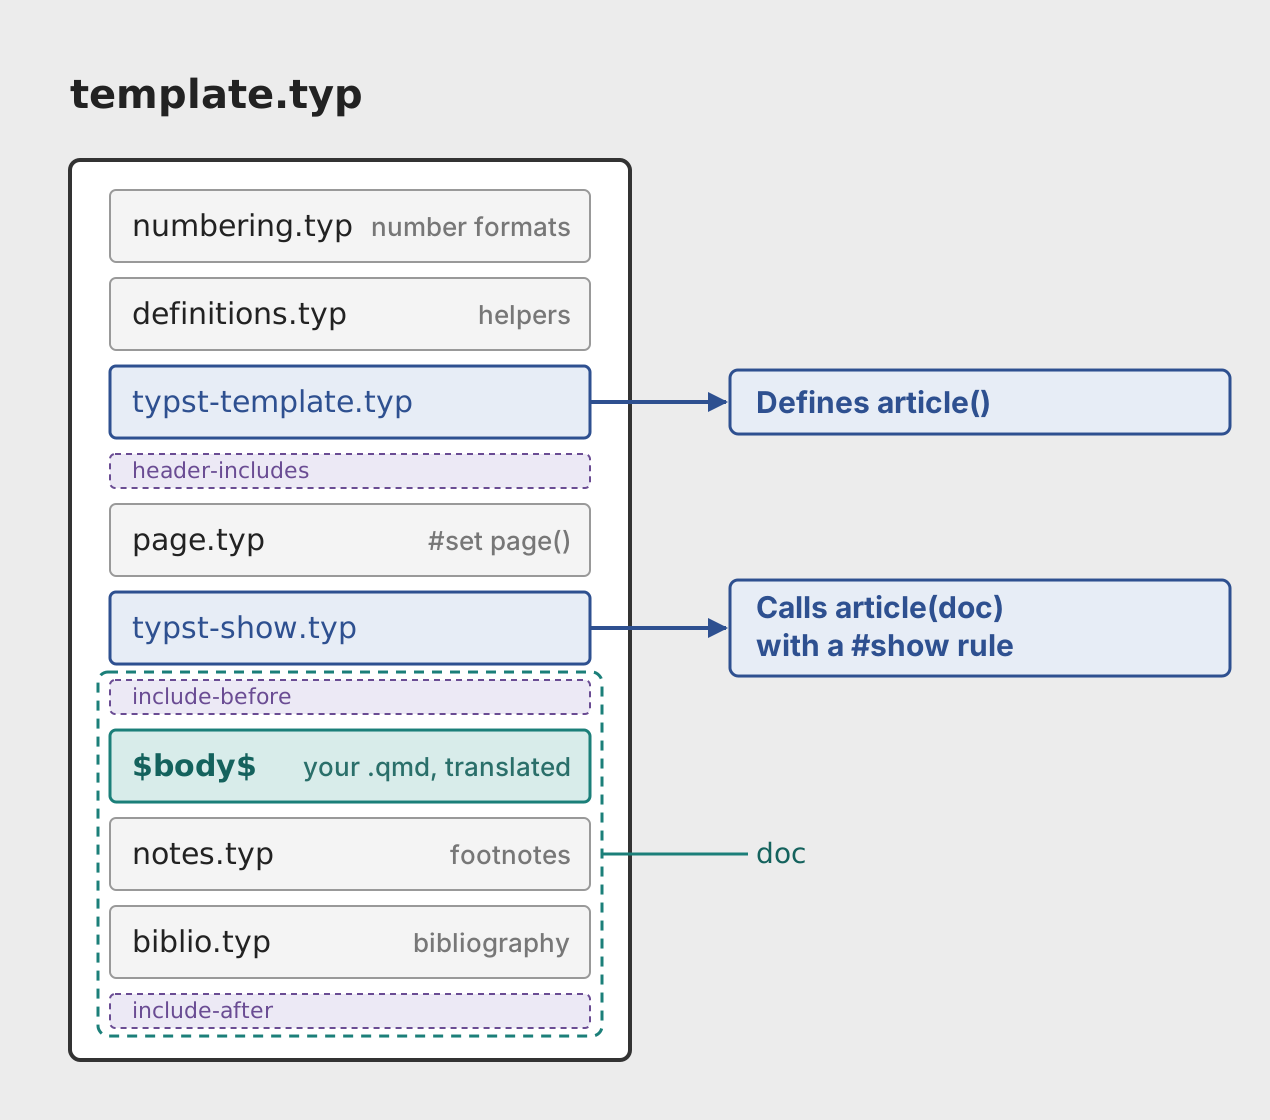
template.typ includes each partial in order. typst-template.typ defines the article() function and typst-show.typ calls it, passing everything below the show rule in as doc. The dashed slots mark where Pandoc injects Typst from your metadata.
We’ve documented the template and partials as of the time of writing, but they are subject to change as Quarto evolves. If you want to view the exact state of the template and partials, you can look at their source code for your version of Quarto in the quarto-cli repo at https://github.com/quarto-dev/quarto-cli/tree/v1.10.11/src/resources/formats/typst/pandoc/quarto, replacing v1.10.11 with your version of Quarto.
It’s best practice to start by editing partials, and only if you can’t get what you need, override the complete template. A complete discussion of editing partials and templates is beyond the scope of this book, but to give you a feel for how this kind of customization works, we’ll walk through a small example of adding a running header to every page of a document.
In Typst a page header is a parameter of the page() function. In Section 10.13.1 you saw that you can use a set rule inside a raw block to set the header, but this won’t reach the first page of your document. The first page of your document is governed by #set page() called earlier in the intermediate .typ file:
report.typ
// Code from the template and partials
// that come before the `page.typ` partial
// ...
#set page(
  paper: "us-letter",
  margin: (x: 1.25in, y: 1.25in),
  numbering: none,
  columns: 1,
)
// ...
// your body down here somewhere
This call is coming from the template partial page.typ, which literally starts with:
page.typ
#set page(
  paper: $if(papersize)$"$papersize$"$else$"us-letter"$endif$,
$if(margin-geometry)$
  // Margins handled by marginalia.setup below
$elseif(margin)$
  margin: ($for(margin/pairs)$$margin.key$: $margin.value$,$endfor$),
$else$
  margin: (x: 1.25in, y: 1.25in),
$endif$
  numbering: $if(page-numbering)$"$page-numbering$"$else$none$endif$,
  columns: $if(columns)$$columns$$else$1$endif$,
)
// ...
The $ wrap Pandoc’s template syntax, which is used for basic control flow, and to translate your document options into Typst syntax. For example $papersize$ is replaced with the value you set for papersize in your document header. Essentially, this chunk is setting any page() parameters you’ve specified as document options, and setting default values if you haven’t.
To add a header we need to call page() with a header argument anywhere after this chunk, but before the call to article() in typst-show.typ. It makes sense to do this in page.typ, since page setup is nominally its job, and doing so means we don’t need to track updates to the more complicated typst-show.typ and typst-template.typ partials.
To do so, you can copy the default page.typ into your project, then append this additional #set page() call to the bottom of the file:
page.typ
// the default page.typ content
// ...
#set page(
  header: [
    #align(right, text(size: 0.8em, [$title$]))
    #block(above: 0.2em, line(length: 100%, stroke: 0.5pt))
  ],
)
Notice this addition directly references $title$. This pulls in the title you’ve set in the document header, so changes to title will automatically propagate to our page header.
To have Quarto use this custom partial, set the template-partials document option to point at your edited copy of page.typ:
report.qmd
---
title: Route Punctuality Report
format:
  typst:
    template-partials:
      - page.typ

---
Now, when rendered the document has a header on every page, as shown in Figure 10.35.
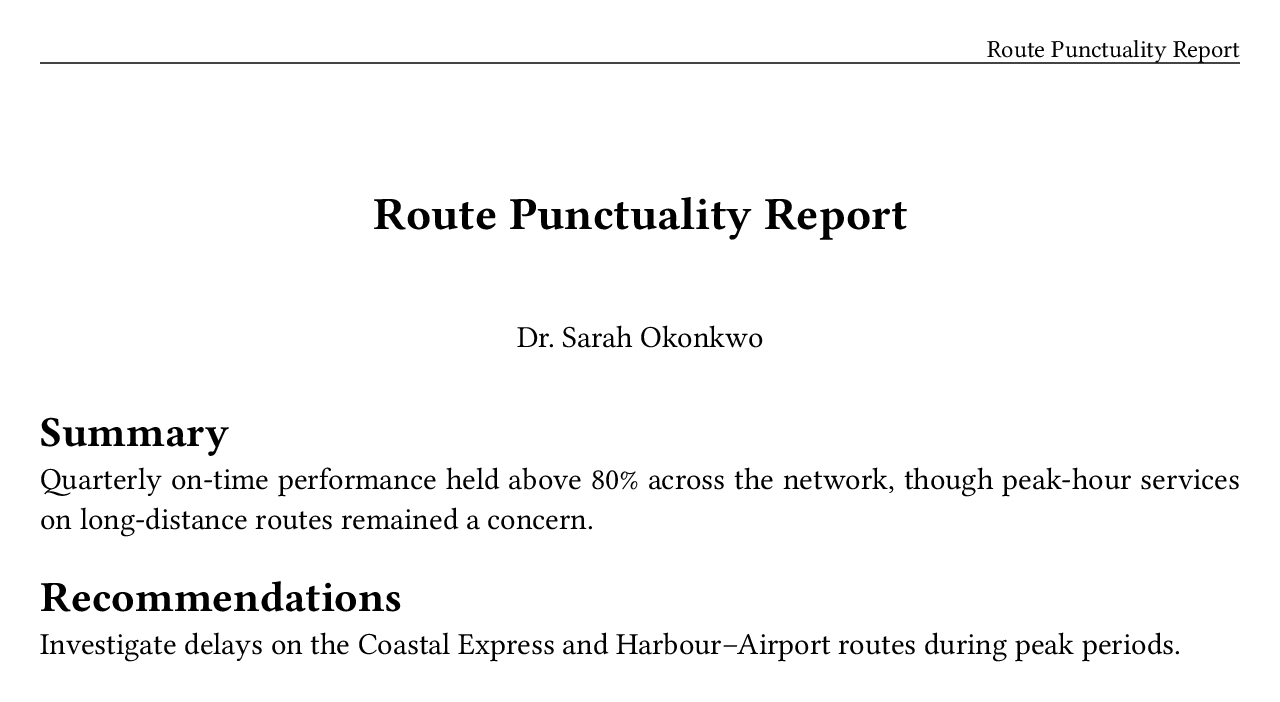
page.typ partial
If you find yourself using the same partial across many projects, or want to share is more widely, you could bundle it into a Typst format extension. You can read more about building Typst format extensions in the Quarto documentation on Typst customization.
10.14 Wrapping Up
In this chapter, you created your first PDF with format: typst, then worked through the types of content you’ll most often use: navigation, links, citations, math, code blocks, and computational outputs. You saw how to make a PDF accessible by targeting the PDF/UA-1 standard, and how to customize its appearance through document options and brand. When you need further customization, you can use set and show rules in raw Typst blocks, and template partials.
There’s plenty more you can do with format: typst that we didn’t cover. Two more worth knowing about:
Typst books. This chapter focused on single documents, but Typst output works in Quarto books too.
Prebuilt templates. The community publishes Typst formats, such as journal article templates, that you can add to your project with
quarto use template. A good place to look for them is on Quarto’s format listing and the community-run Quarto extensions listing.
We only covered a subset of the document options available for format: typst. For the full set, see the Typst format reference in the Quarto documentation.