6 Publishing
When we talk about publishing Quarto documents, we usually mean making the rendered documents available to others via the web. In this chapter, you’ll learn about Quarto’s built-in tools for publishing your content. However, publishing rendered documents to the web isn’t the only way to share Quarto documents, so you’ll also learn a little about sharing documents in other ways.
6.1 Publishing to the web
The quickest way to publish a single document is via the quarto publish command, providing the document filename as an argument:
Terminal
quarto publish document.qmdThe command will prompt you to select a Provider:
? Provider:
❯ Quarto Pub
  GitHub Pages
  Posit Connect
  Netlify
  Confluence
  Hugging Face Spaces
You’ll learn a bit more about the providers later in this chapter, but let’s use Quarto Pub for illustration.
Quarto Pub is a free service. To follow along, you’ll need to Sign Up for an account first.
Quarto will prompt you to authorize your account when you select a Provider for the first time. This looks different for each provider, but for Quarto Pub, you’ll be asked to authorize your account via your default internet browser:
? Provider: › Quarto Pub
? Authorize (Y/n) ›
❯ In order to publish to Quarto Pub you need to authorize your account.
  Please be sure you are logged into the correct Quarto Pub account in your
  default web browser, then press Enter or 'Y' to authorize.
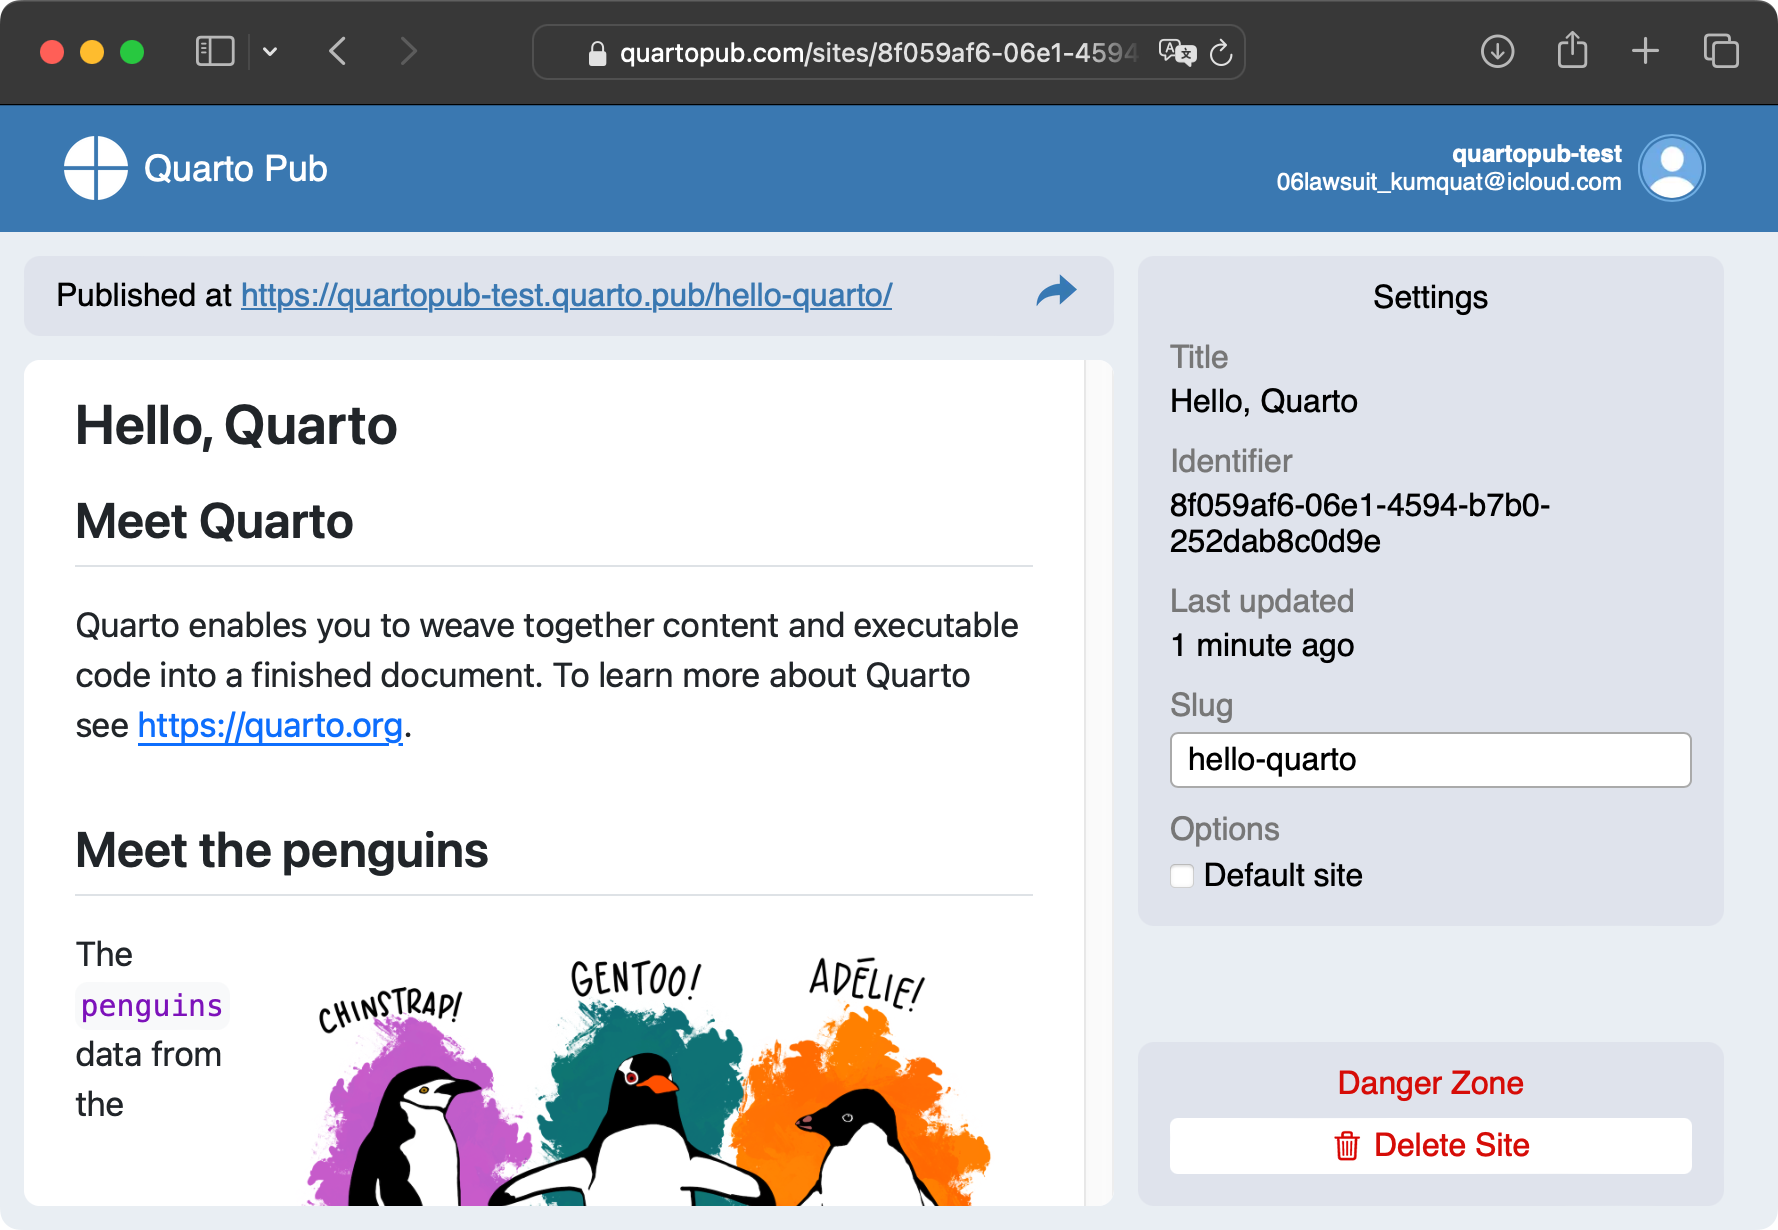
Once authorized, Quarto will ask you to confirm the document title. Then Quarto will render your document one more time, before sending it (and all its required resources) to the Provider. Once done, a browser will open to view your published content, as shown in Figure 6.1.

If you aren’t logged in to Quarto Pubs your browser will open to the public URL, rather than the site administration view shown in Figure 6.1.
Pages published on Quarto Pub have public URLs of the form: { username }.quarto.pub/{ document_title }/. You can share the URL and anyone can view your rendered content.
6.2 The publishing process
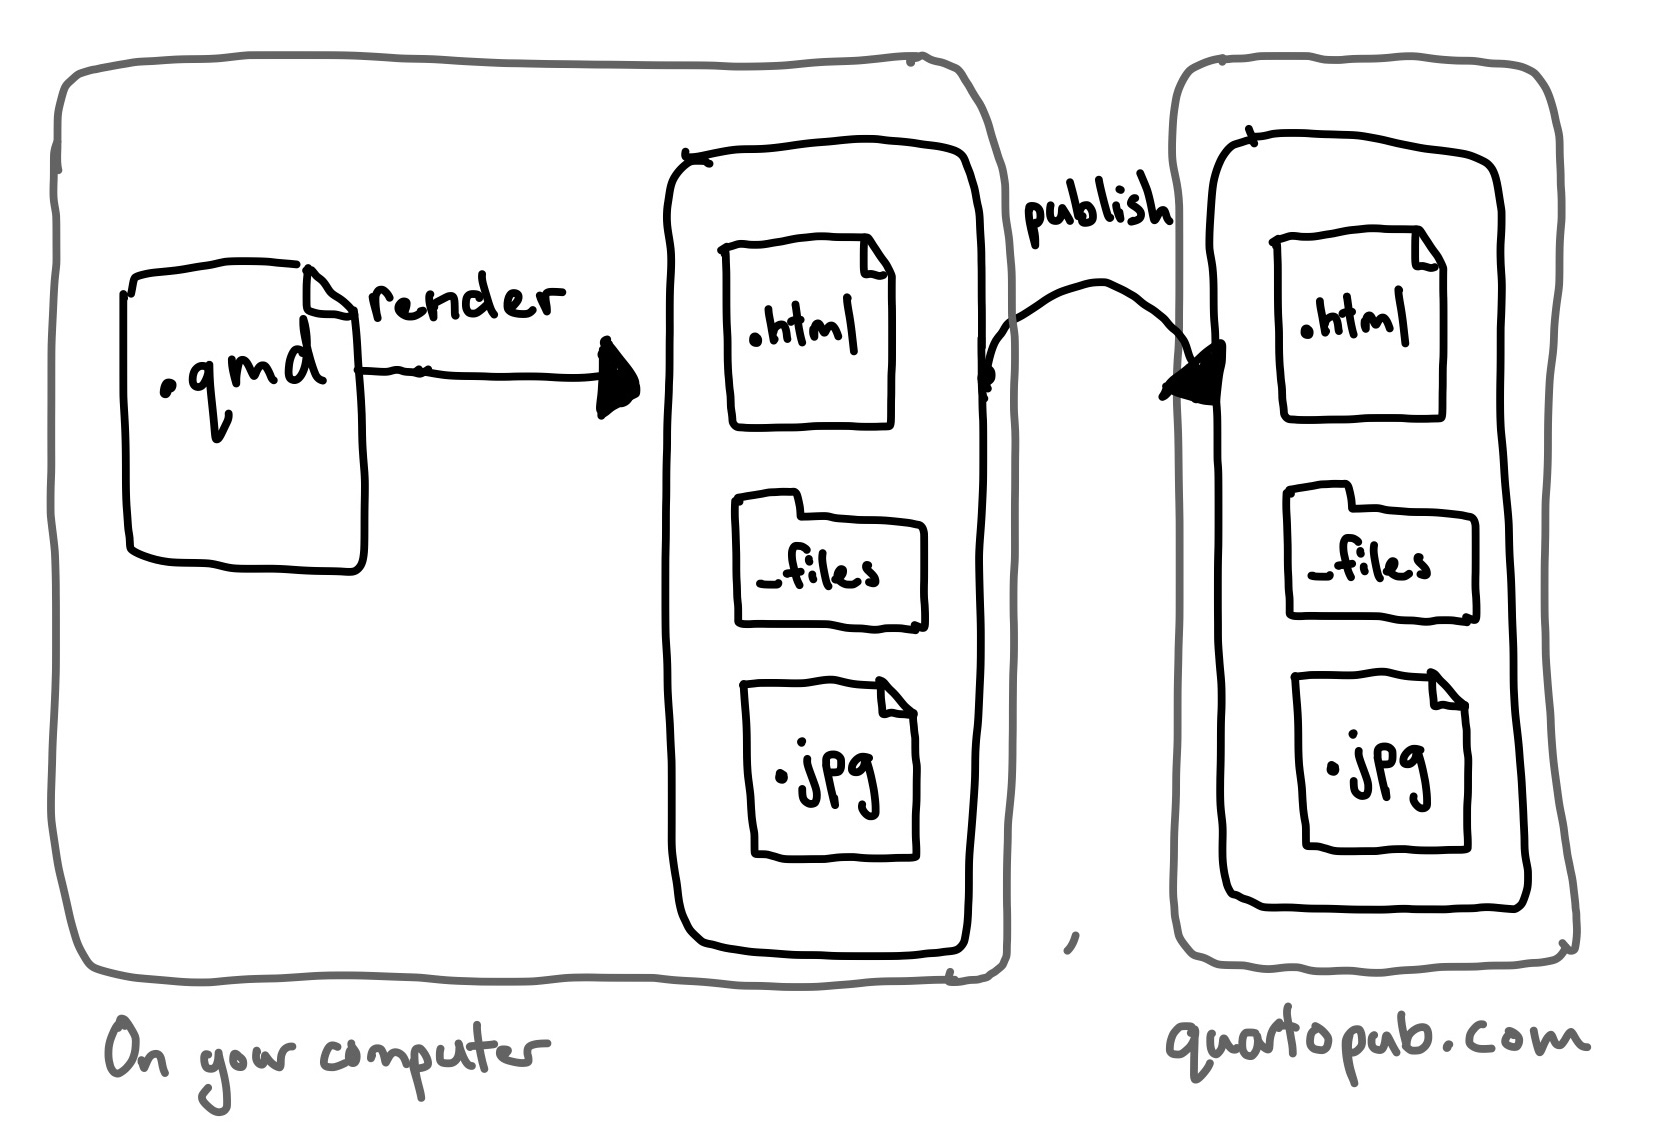
The quarto publish command relies on local rendering — that is, your Quarto documents are rendered locally on your computer using your local installation of the Quarto CLI. Only the output files are then transferred to the publishing provider. In Figure 6.2 we illustrate this as two separate steps—render then publish— but they both occur when you run the quarto publish command.

quarto publish process. Input files are rendered locally, then the output files and their dependencies are uploaded to the publishing provider.
Quarto generates a single self-contained output file for some output formats, like PDF or Word documents. This single output file is the only thing that needs to be transferred to the provider to share it with others. However, for some formats, notably HTML, Quarto generates a collection of files, which might depend on other local files like images. All of these files and their dependencies need to be transferred to the provider to publish the content successfully. The advantage of quarto publish is that Quarto identifies all these required files for you.
Any computations are also executed locally using your version of knitr or jupyter. However, if you use freeze (see Chapter 13 for details) the computations might have been executed elsewhere, or at earlier time.
Other publishing models involve local code execution combined with remote rendering, or both remote code execution and remote rendering. Remote rendering is particularly useful when it is automated whenever source documents change—a workflow known as Continuous Integration—you’ll learn more in Section 18.10.
6.3 Updating published documents
When you use quarto publish details about what and where you publish are stored in a file called _publish.yml:
_publish.yml
- source: hello.qmd
  quarto-pub:
    - id: 8f059af6-06e1-4594-b7b0-252dab8c0d9e
      url: 'https://quartopub-test.quarto.pub/test'
This means when you run quarto publish on a document or project a second time, you’ll be given the option of using the same details—in effect updating your published content.
The details in _publish.yml aren’t sensitive (there are no authentication details) so you can check it into version control.
6.4 Publishing projects
Rather than publishing a single document, you can also publish a Quarto project. From the project directory, run quarto publish without specifying a filename:
Terminal
quarto publishOnly website, book, and manuscript projects can be published this way.
If you are trying to publish a project, i.e., a collection of documents, that isn’t a website, book, or manuscript, consider making it a website. This only requires adding type: website to the project key in _quarto.yml:
_quarto.yml
project:
  type: website
Your rendered files will then be available at corresponding URLs, e.g. a file report.qmd in the root of the project directory that renders to PDF will be available at { provider URL }/report.pdf. Adding website navigation is optional, but will generally make things easier to find. You’ll learn more about that in Chapter 18.
6.5 Providers
We first illustrated Quarto Pub as a publishing provider because it’s one of the easiest to set up. But quarto publish gives you some other options. The two others we think are most useful if you are choosing for yourself are Netlify and GitHub. A brief summary comparing their features along with Quarto Pub is shown in Table 6.1.
| Provider | Private Source | Private Site | Custom Domain |
|---|---|---|---|
| Quarto Pub | ✔️ | ✖️ | ✖️ |
| GitHub | Paid plans | GitHub Enterprise Cloud only | ✔️ |
| Netlify | ✔️ | Paid plans | ✔️ |
You can specify the provider directly in the call to quarto publish (rather than relying on the interactive prompt shown in Section 6.1):
Terminal
quarto publish quarto-pub document.qmd6.5.1 GitHub Pages
Terminal
quarto publish gh-pages document.qmdGitHub Pages is a hosting service provided by GitHub at the repository level. If you are storing your source on GitHub anyway, it makes sense to also publish via GitHub Pages.
When you publish, Quarto creates a special gh-pages branch, renders your document or project to this branch, and pushes this branch to GitHub. This branch is then processed on GitHub’s side, making it available at a URL of the form { user }.github.io/repo-name.
If you use GitHub through one of its “Free” plans you can only use GitHub Pages on public repositories. If you’d prefer your source documents weren’t available publicly you’ll either need to upgrade your GitHub plan, or use something like Netlify or Quarto Pub instead.
You can read more about publishing to GitHub with quarto publish on the GitHub Pages page in the Quarto documentation.
An alternative to using quarto publish is to commit your rendered document or site to your repository in a docs/ folder and set GitHub Pages to publish from there. You can read more about this workflow at Render to docs on the Quarto documentation website .
6.5.2 Netlify
Terminal
quarto publish netlify document.qmdNetlify provides services for building, deploying, and managing websites. When you publish to Netlify using quarto publish, your document or site will be set up as what Netlify calls a manual deploy — you deploy by manually running quarto publish. Your output files are sent to Netlify and Netlify serves them at a URL of the form { random identifier }.netlify.app.
You can manage your deployed site via Netlify’s website, and Netlify includes some neat features like one-click rollbacks to a previously deployed site, and the ability to use a custom domain. Netlify’s free plans limit how many sites you can have and how much bandwidth is used to serve them. However, these limits will likely not be reached for low-traffic personal sites.
Rather than using quarto publish you can get Netlify to deploy from Git provider. In this workflow, you commit your rendered document or site to your repository in a folder (e.g. docs/ or _site/) and connect Netlify to your Git provider, setting the folder as the Publish directory. You can read more about this on the Quarto documentation website at Publish from a Git Provider.
Netlify excels in continuous integration and you can set it up to preview deployments based on branches or pull requests. The features require a more complicated publishing set up you’ll touch on in Section 18.10.
6.5.3 Other providers
You are most likely to use Posit Connect or Confluence in organizational settings where your IT department will manage them. Hugging Face has a more complicated set up and probably only makes sense if you are using Hugging Face beyond Quarto already.
The quarto publish model described in Section 6.2 also applies to these providers. You can read more about the details of publishing in the Publishing Guide on the Quarto documentation website.
6.6 Sharing documents in other ways
You can share self-contained output files like PDFs or MS Word documents in any usual way: by email, placing on a shared drive, or using cloud storage. You can do the same with other output files but you need to be careful to also share any dependencies of those files.
For HTML output you have two options: create a self-contained file, or share a directory.
6.6.1 Create a self-contained file
For HTML output one option is to set the embed-resources option to true:
document.qmd
---
title: Self Contained HTML
format:
  html:
    embed-resources: true
---
When rendered this ensures all required dependencies are embedded directly in output .html file. You can then send, or otherwise share this one file (e.g. document.html) and it will appear the same to your viewers as it does to you.
If your document contains math, and you might view it offline, add self-contained-math: true to ensure the math libraries are also embedded (by default they aren’t because they are quite large):
document.qmd
---
title: Self Contained HTML
format:
  html:
    embed-resources: true
    self-contained-math: true
---6.8 Tools
Currently, the only tool that provides an interface to publishing from Quarto is RStudio.
6.8.1 RStudio
In RStudio when you have a Quarto document or project open, you’ll see a Publish ![]() button in the Editor. This button can facilitate publishing to RPubs, Posit Connect and Posit Cloud. Behind the scenes, this button uses the rsconnect R package rather than
button in the Editor. This button can facilitate publishing to RPubs, Posit Connect and Posit Cloud. Behind the scenes, this button uses the rsconnect R package rather than quarto publish. If you use RStudio and are publishing to one of RPubs, Posit Connect or Posit Cloud we reccomend reading the RStudio documentation on Publishing (https://docs.posit.co/ide/user/ide/guide/publish/publishing.html).
6.9 Wrapping up
In this chapter, you’ve seen that sharing your rendered Quarto documents is as simple as running quarto publish. You’ve learned this model of publishing relies on local rendering, but more complicated models exist and you’ll touch on them in later chapters.
There’s nothing special about Quarto source documents, or stand-alone outputs, so you can share them in your usual ways.